My first old-timey glass dryplate photograph!

I recently bought a cool old-timey (from 1896) folding “pocket” camera at a local garage sale and here is my first photograph! It’s so stinkin cool! (click for full size)

If you care to know more, here are all the gory details!

The Camera

The camera is a folding Rochester Cycle Poco No. 2 model from 1896.

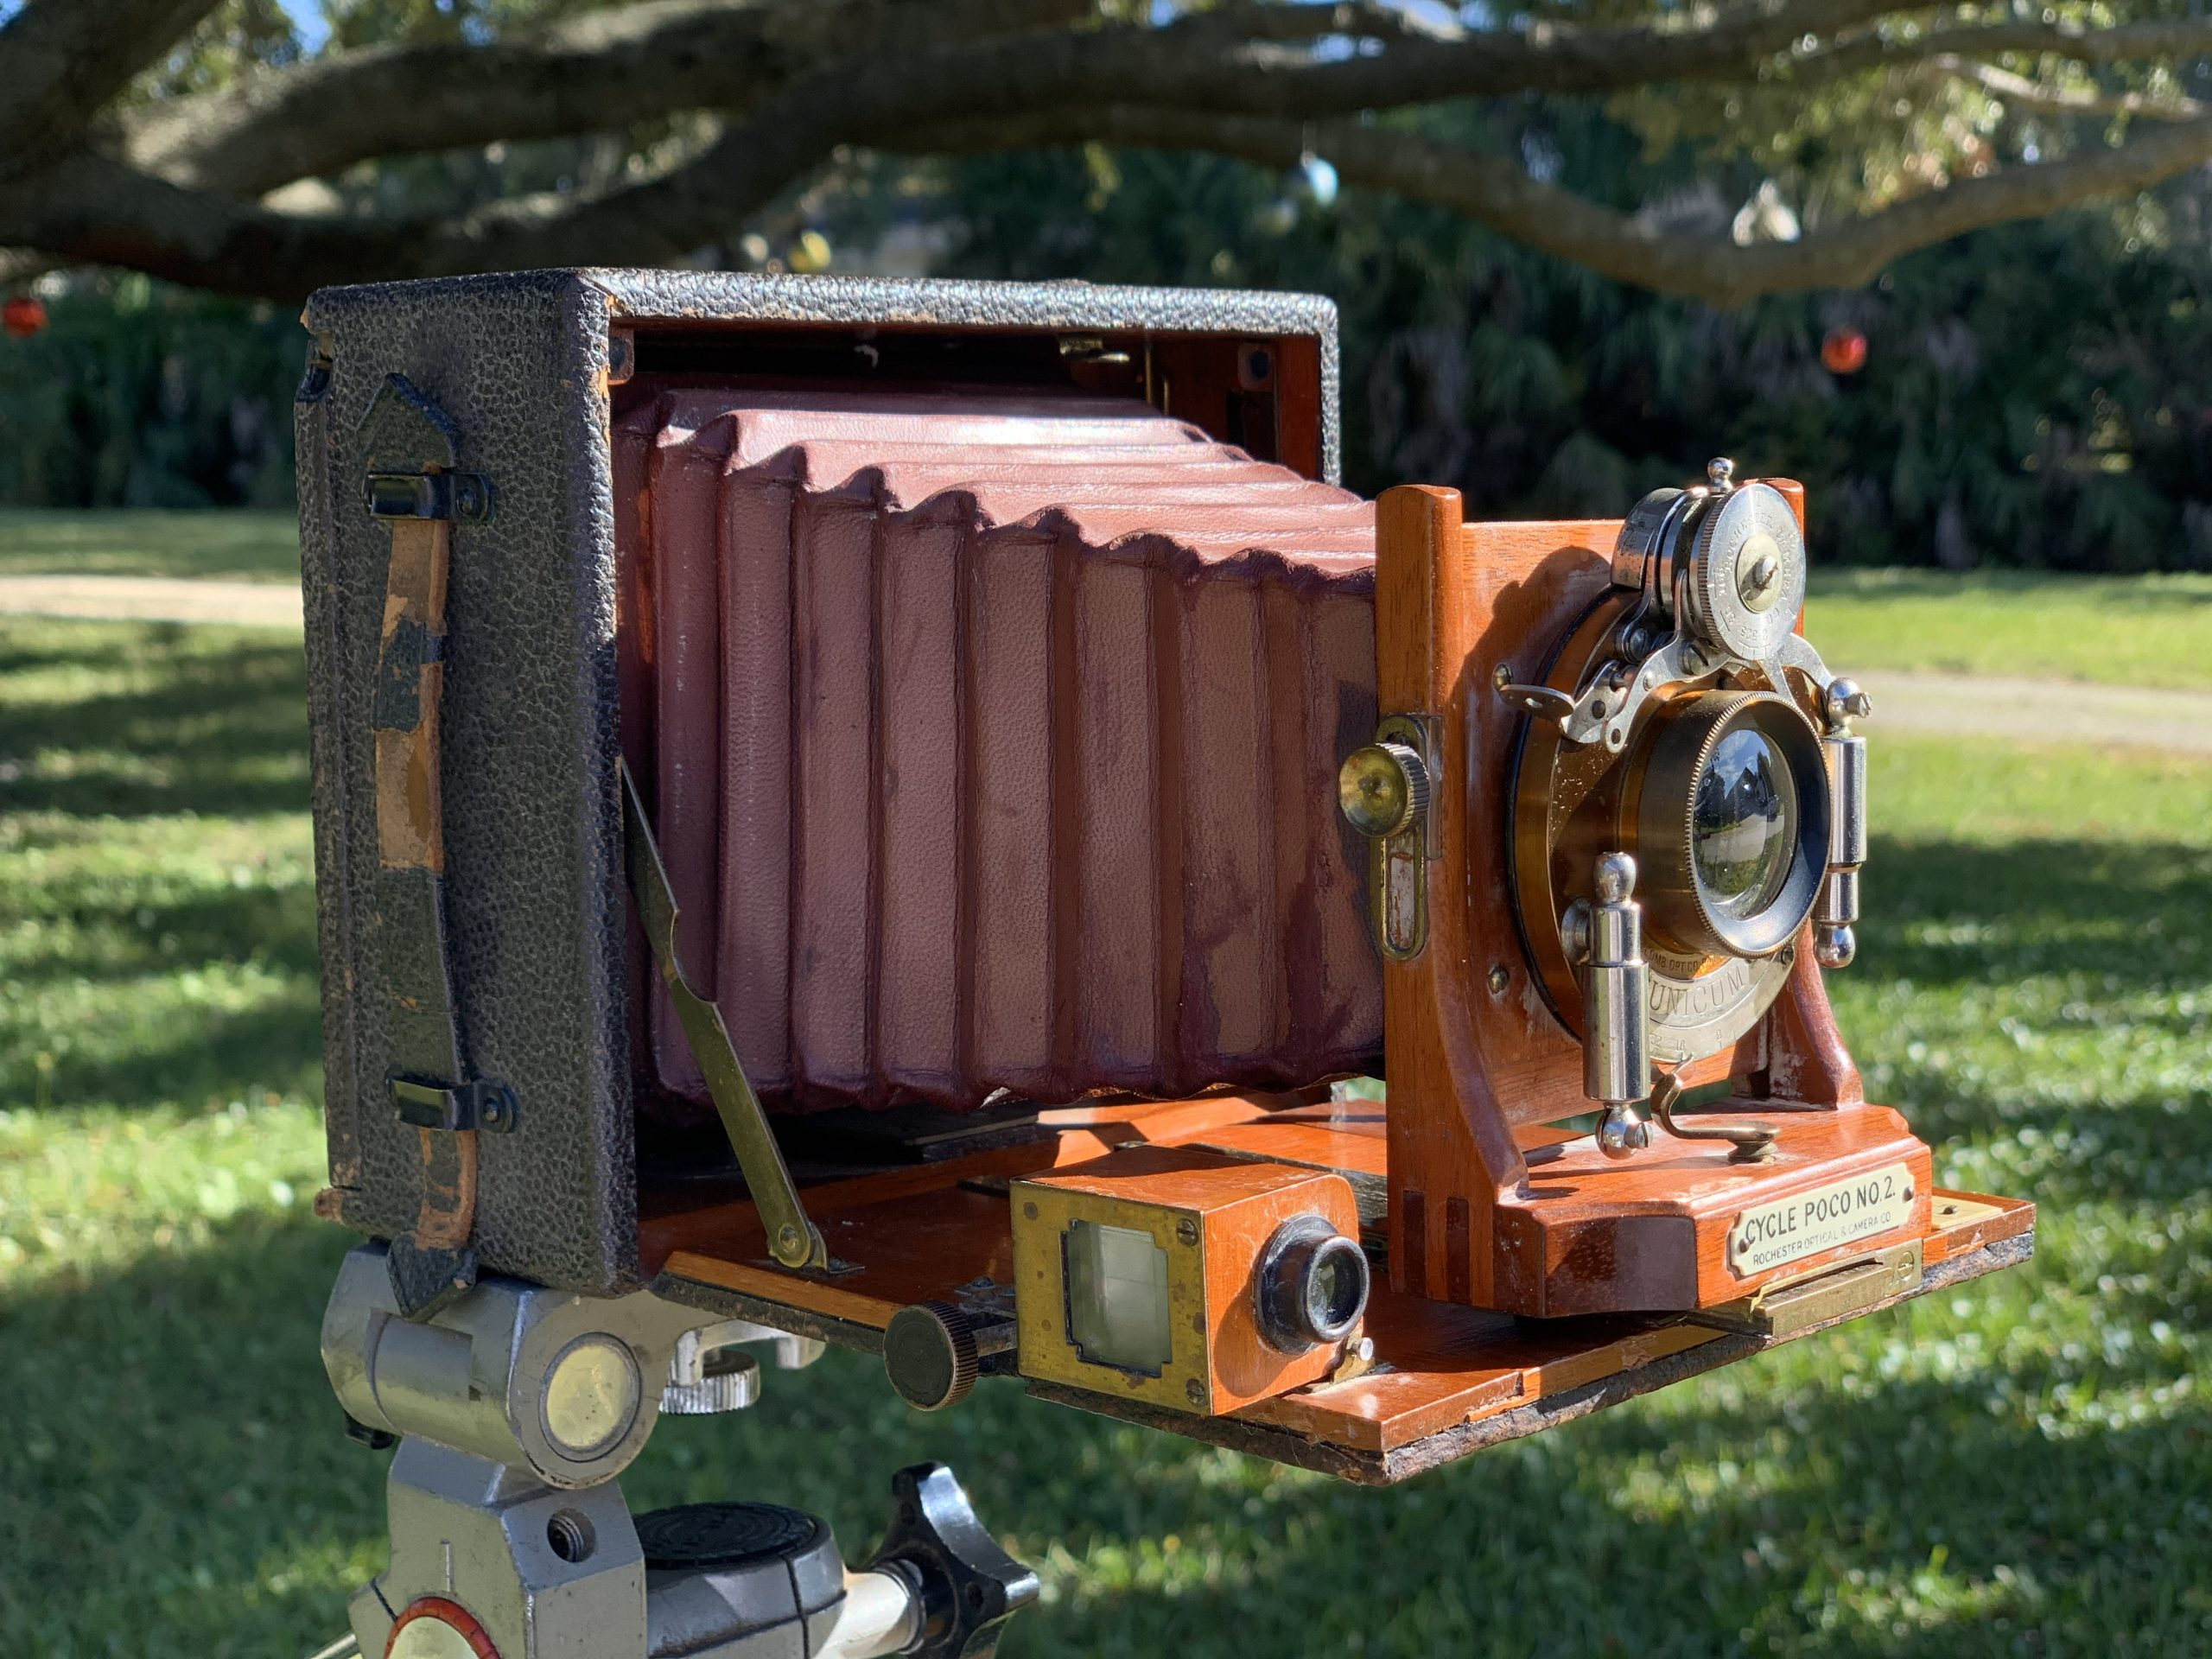
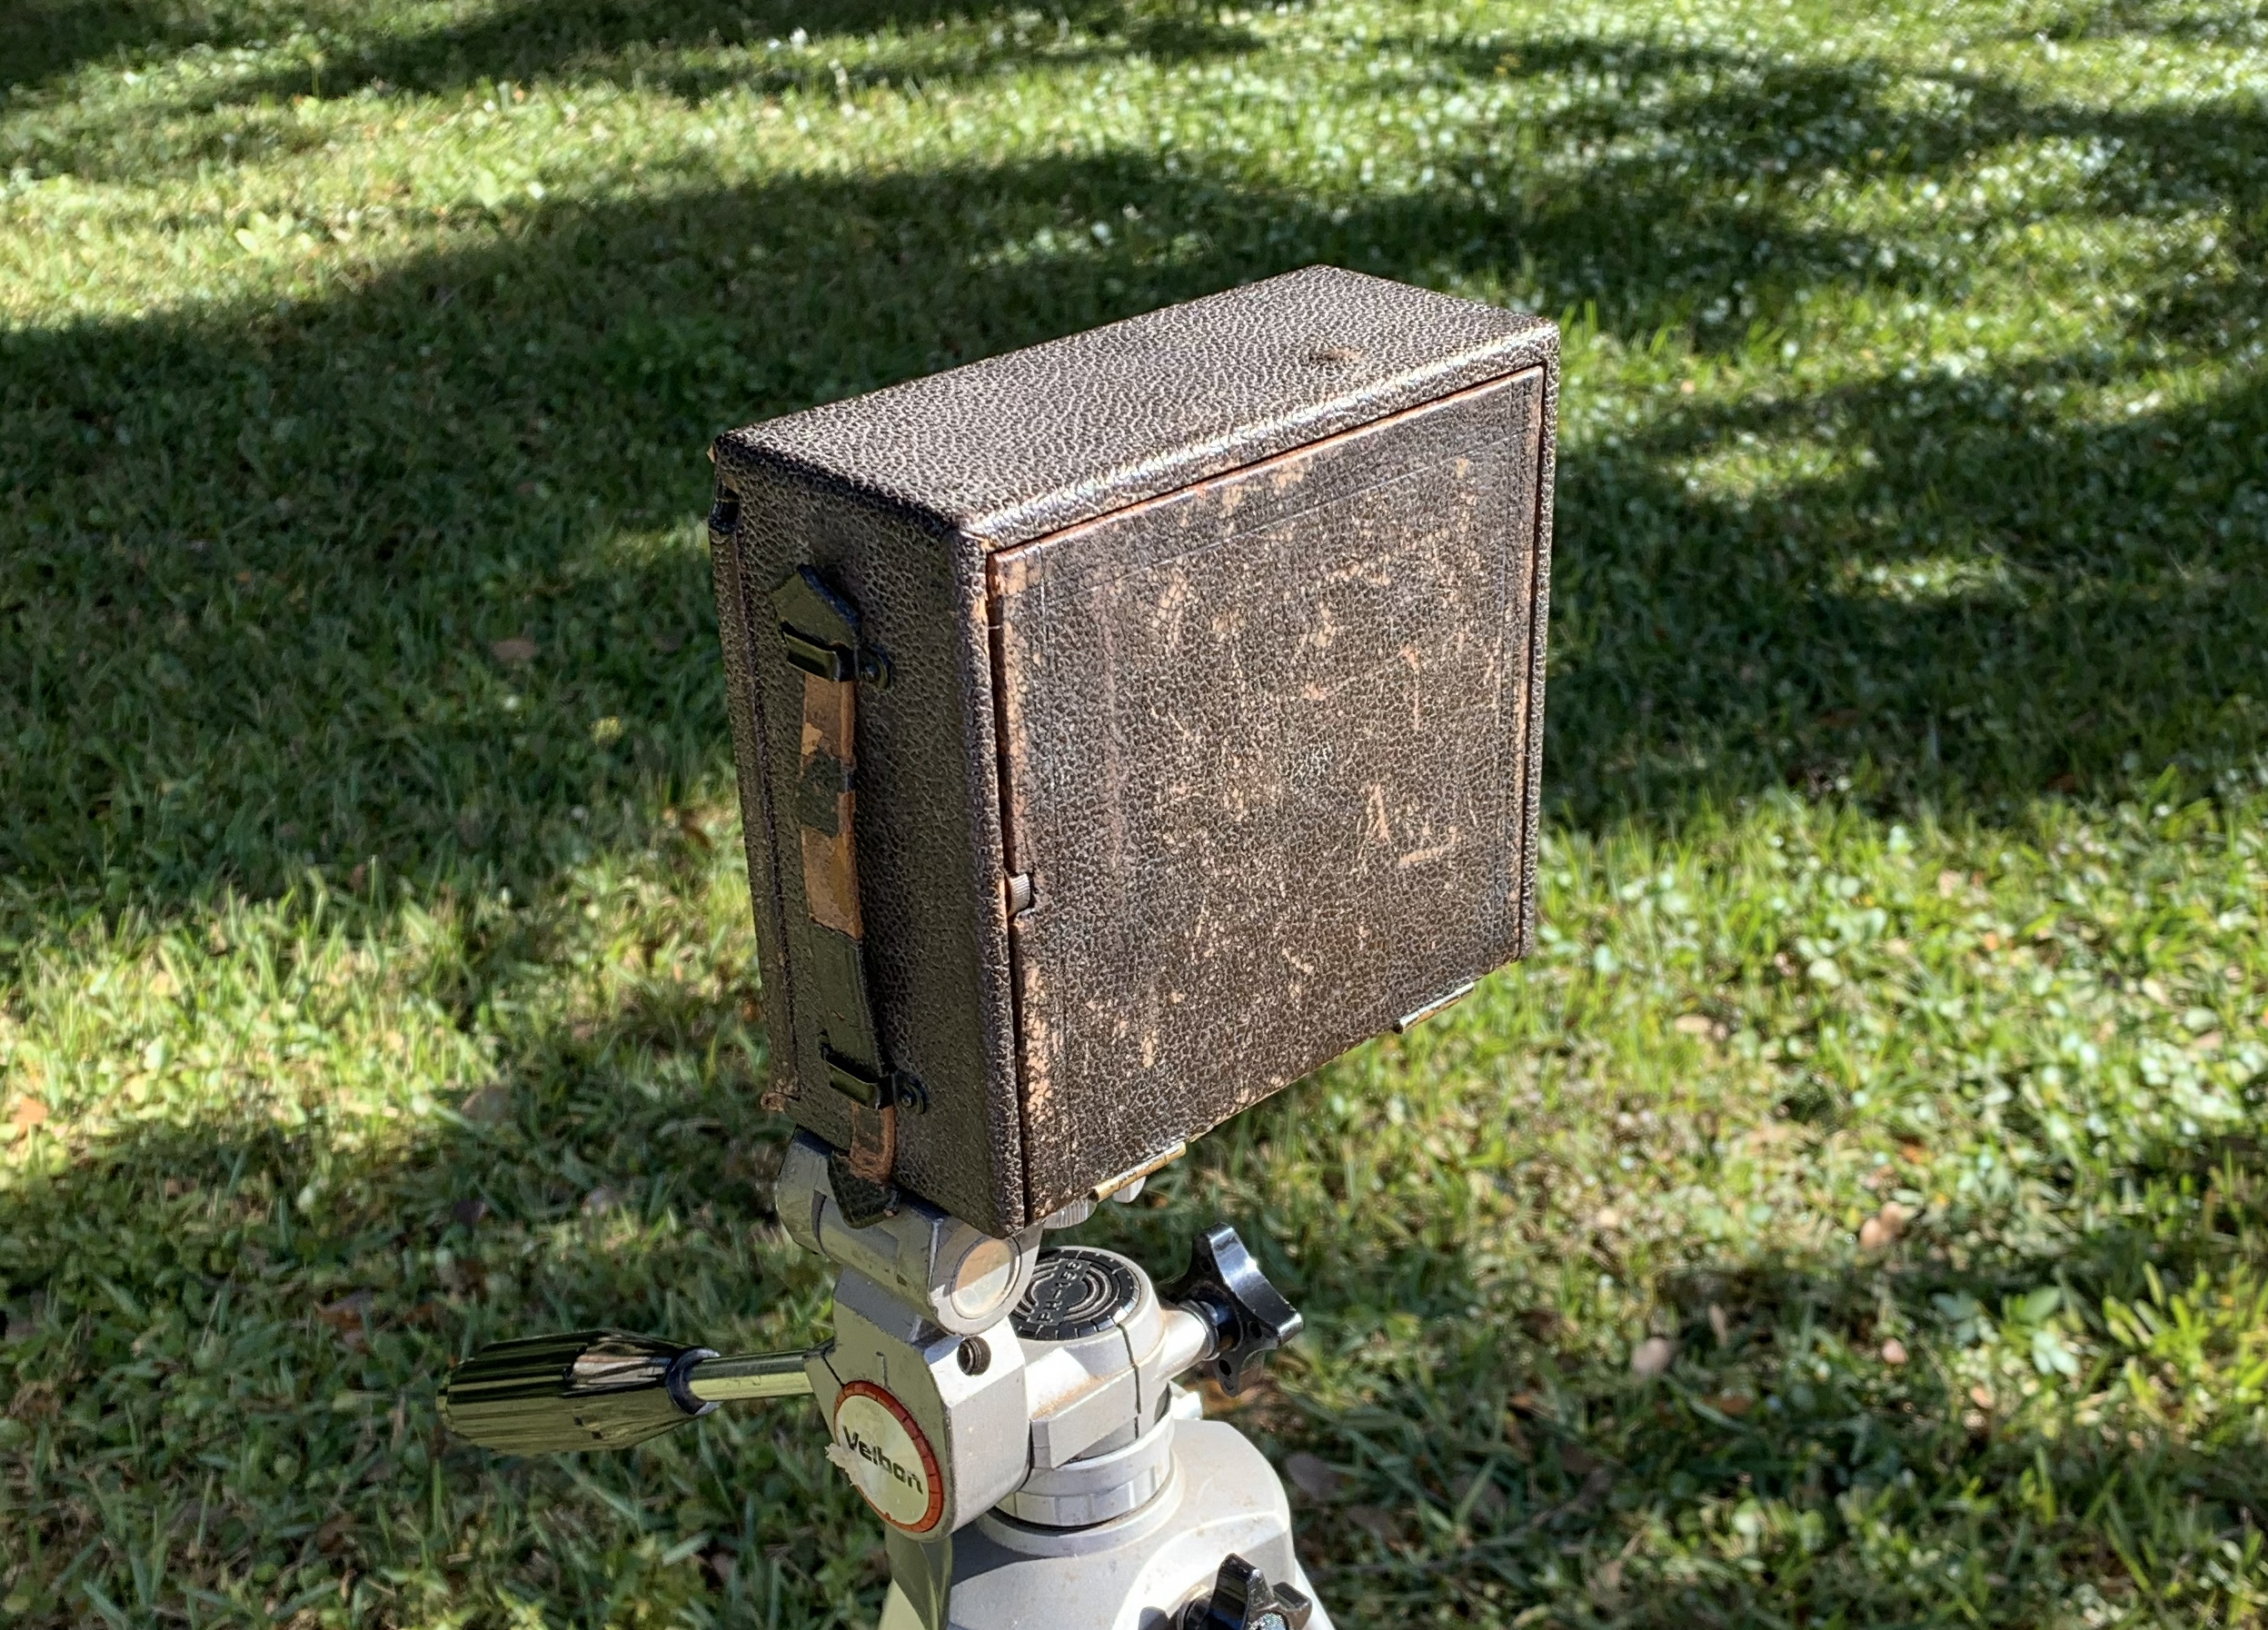
It’s a beautiful little portable foldable camera. It’s mostly made out of wood except for the actual iris/lens/trigger part. It folds up into a pretty small box that measures 6 inches by 6 inches by 3 inches.

The trigger mechanism was locked up when I bought it, but it took it completely apart and cleaned everything and put it back together and it works fine now. Well, except for the timer part. The timer mechanism is really cool. It’s not a mechanical timer. It’s a pneumatic timer, meaning it pushes air through a tiny hole in a pneumatic cylinder for slow controlled repeatable movement. In the below photo, the pneumatic cylinders are to the right and left of the central lens.

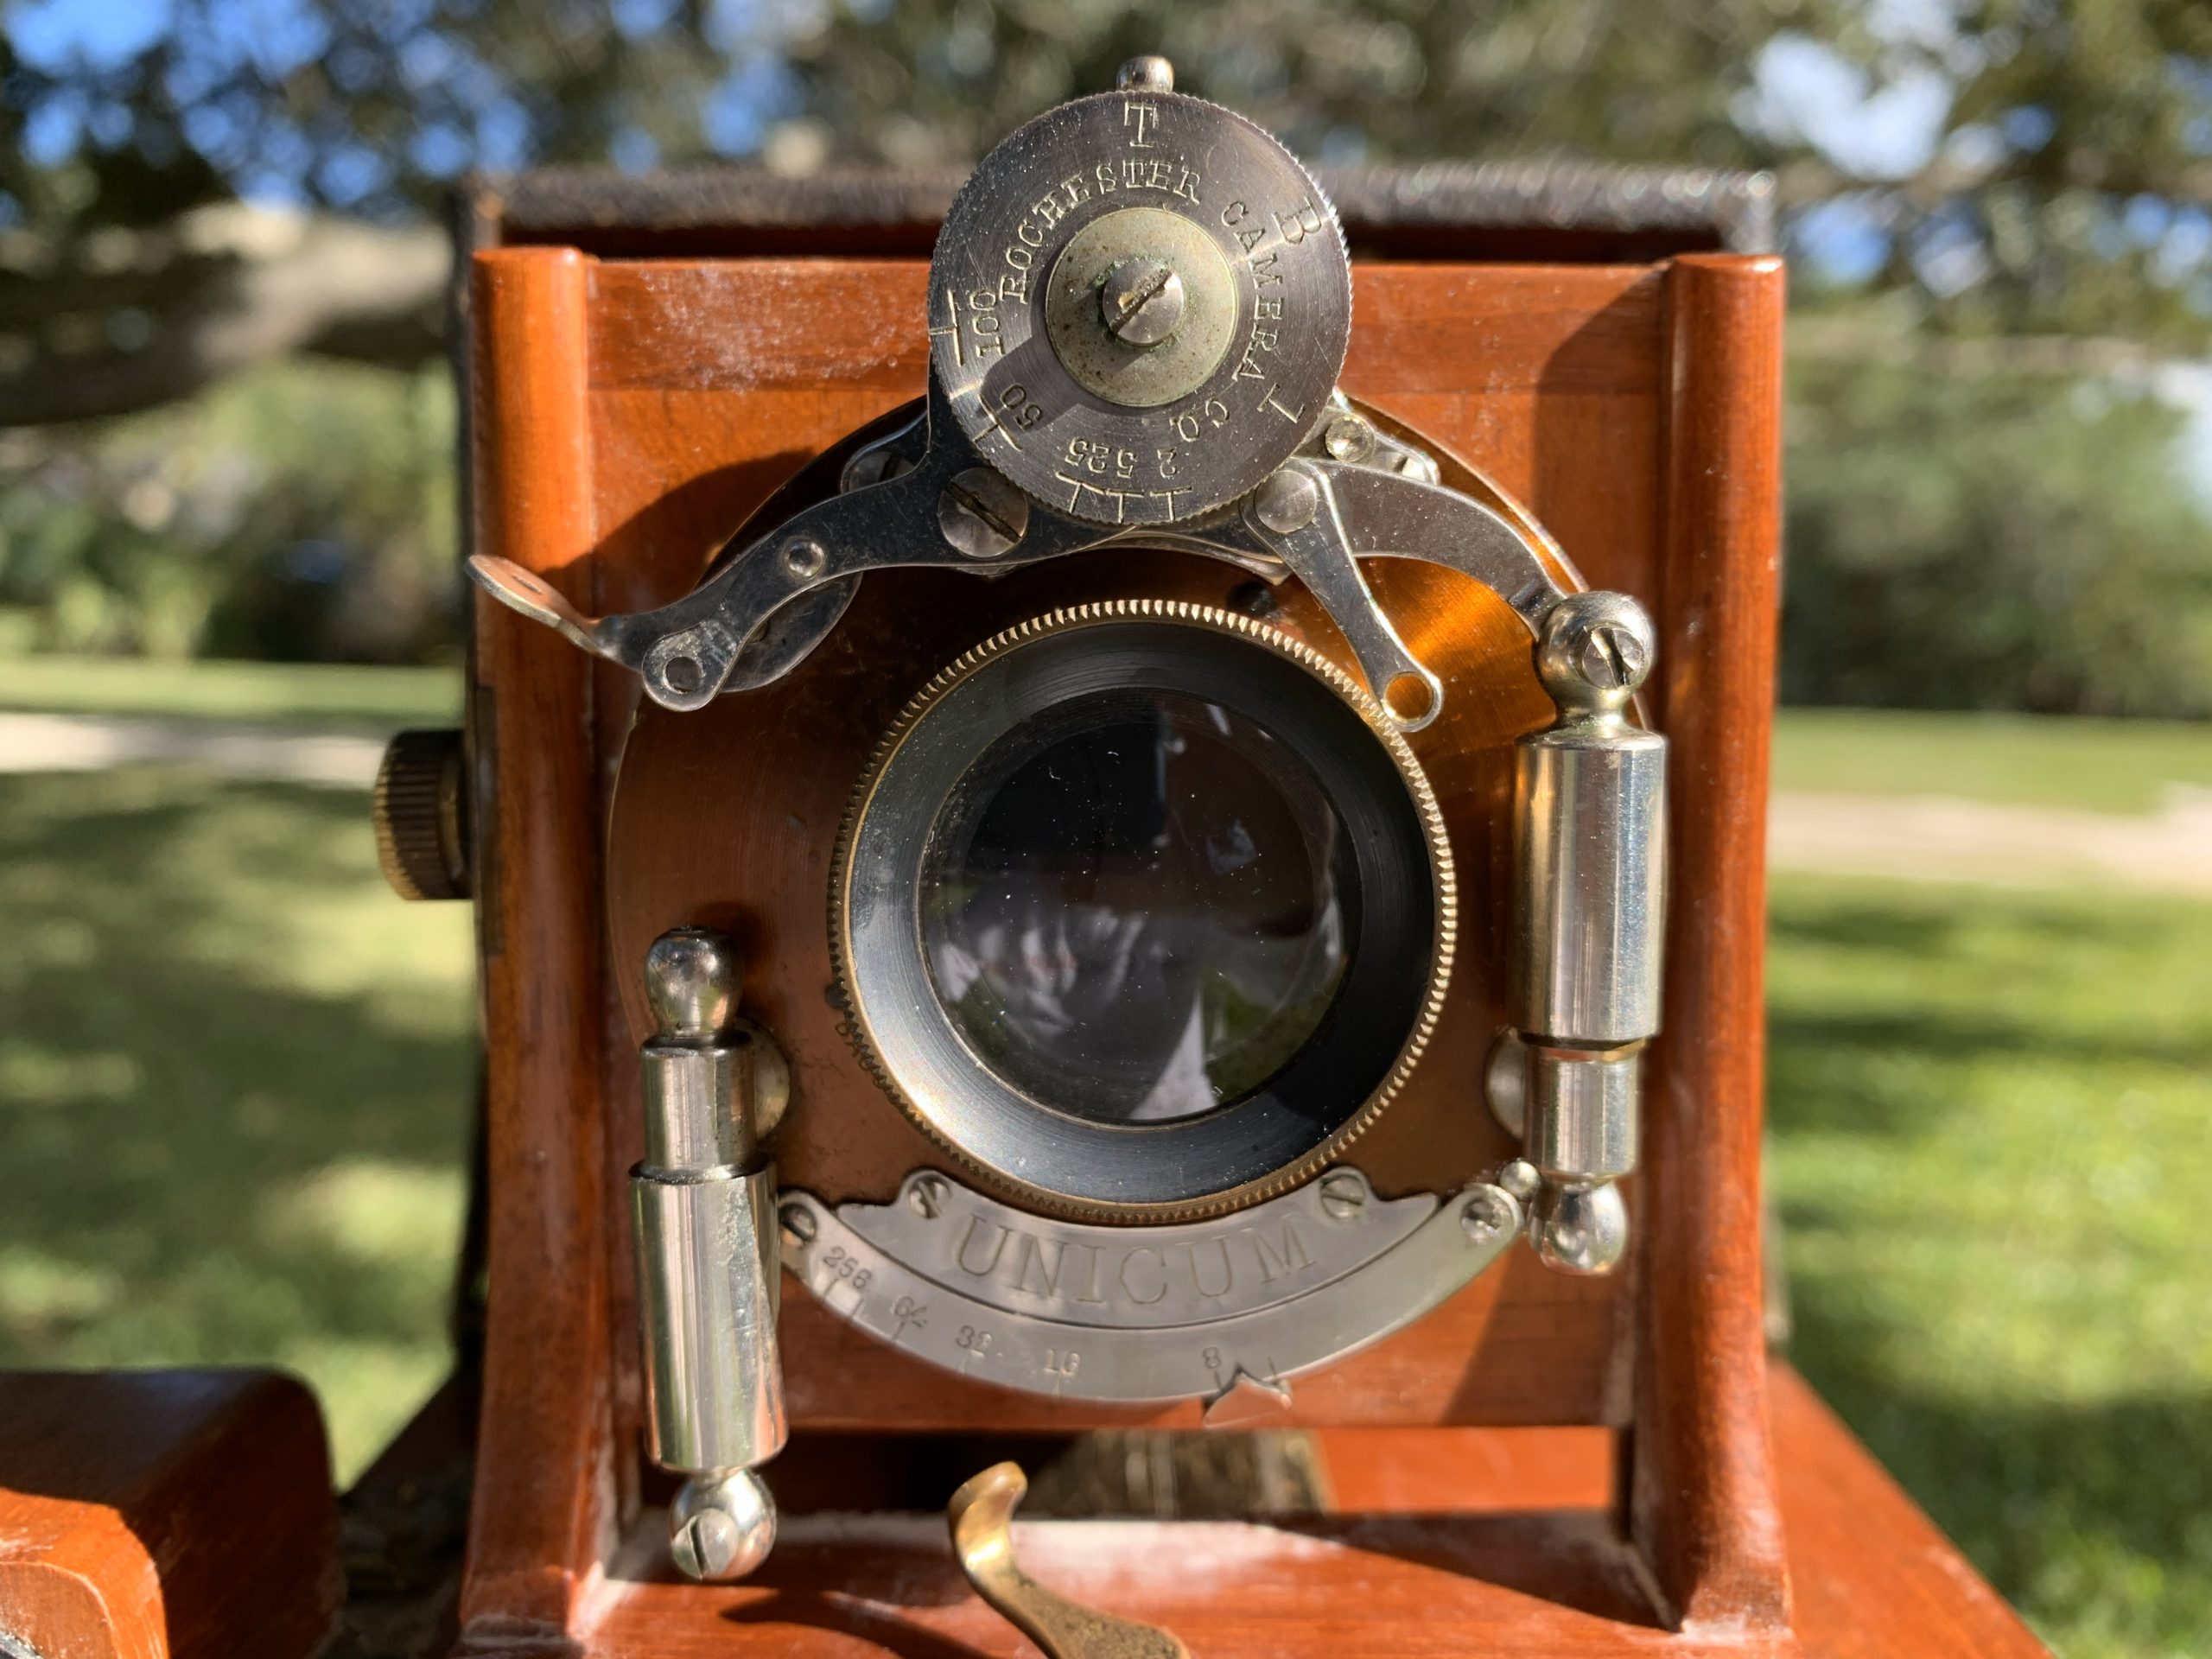
Sadly, the pneumatic cylinders are completely locked up and I could not break them free without busting them, so I just disconnected them and I’m using the camera in manual, or bulb, trigger mode.

This is fine, though, since the “film” available for this camera is only ISO 2, which is a very very slow film. Meaning the shutter has to be left open for a while in order for the slow film to gather enough light. Even in full sunlight, the shutter needs to stay open for a quarter or even a half a second, which I’m pretty capable of operating manually.

The “Film”

This camera doesn’t actually take film though. It exposes light to a 4 inch by 5 inch glass plate, known as a dryplate , that’s been coated with a thin layer of light sensitive silver gelatin . Flexible plastic photographic film was invented in the late 1880s, but was not super popular when this camera was sold. Most cameras of this era used glass dryplates.

I bought some hand-crafted hand-coated glass dryplates from a small online company in Slovenia. The company is called Zebra Dry Plates , so go check them out! They also have some really great alternative photography videos on their YouTube channel !

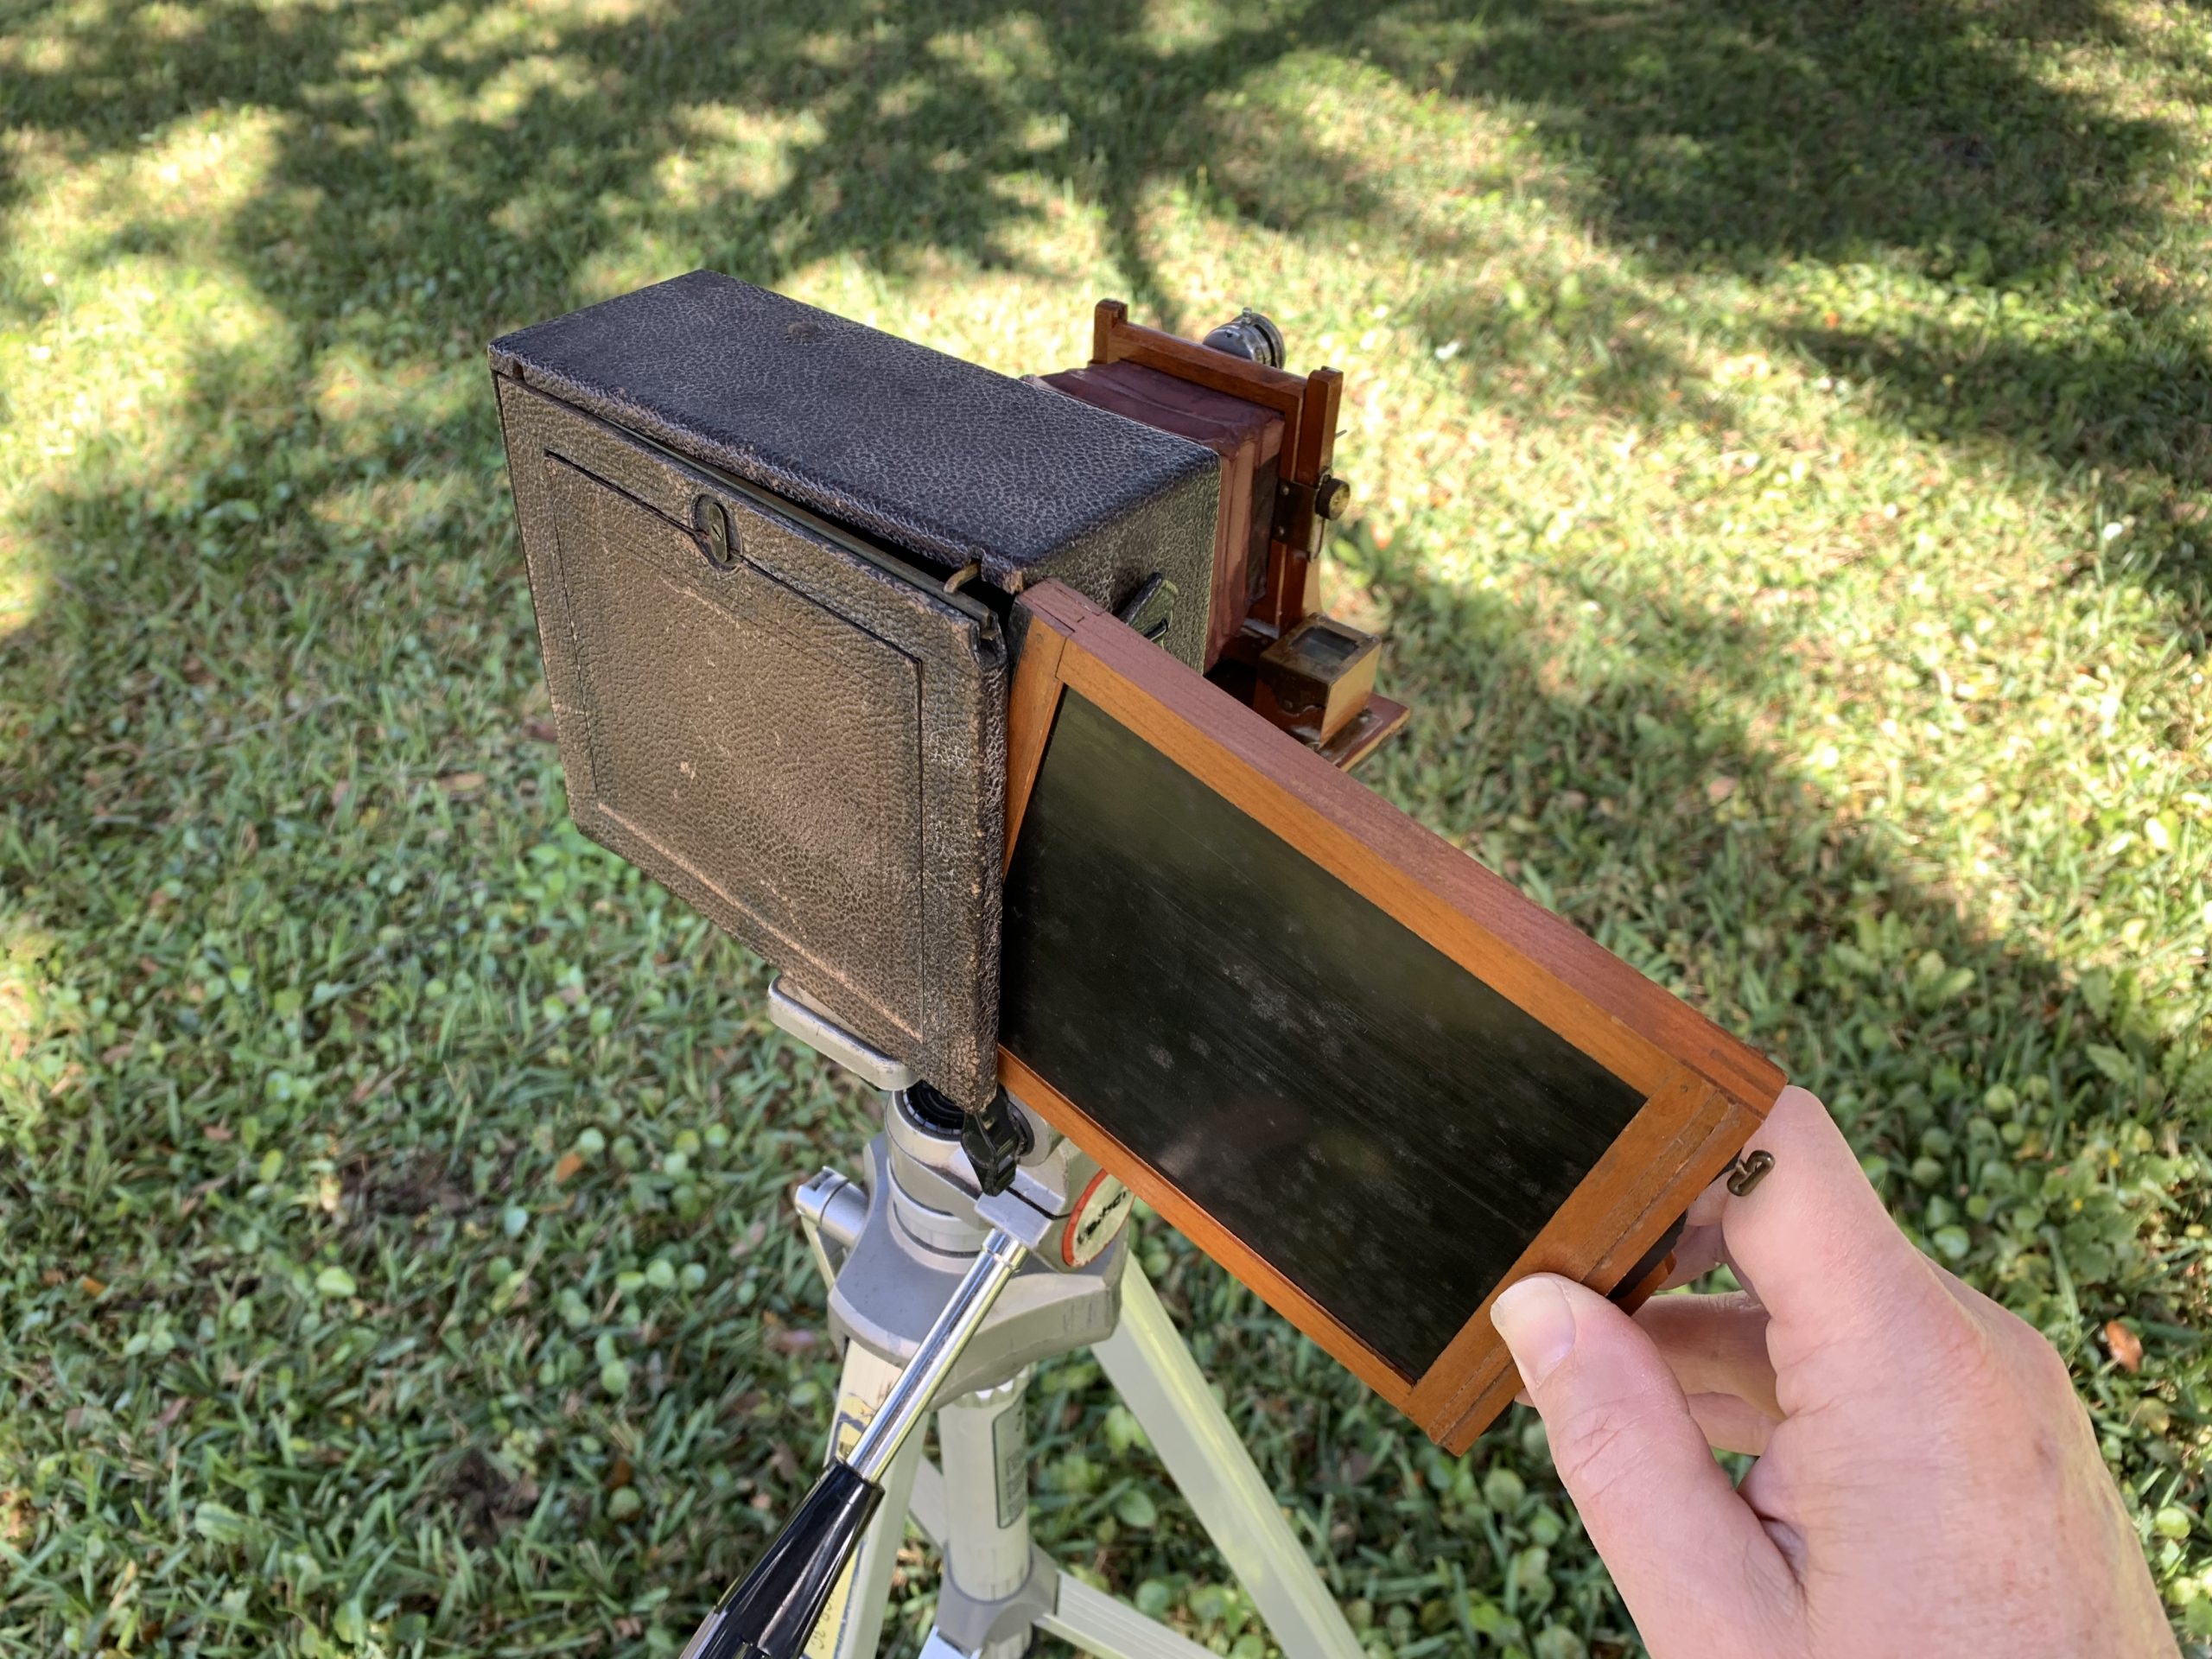
The camera comes with several cool wooden holders for exposing light to the plates. The holders are reversable so each holder can actually carry and expose 2 separate plates. You have to load your glass dryplates into these holders in a completely dark room or a room with only infrared light in order to keep from exposing your “film”.
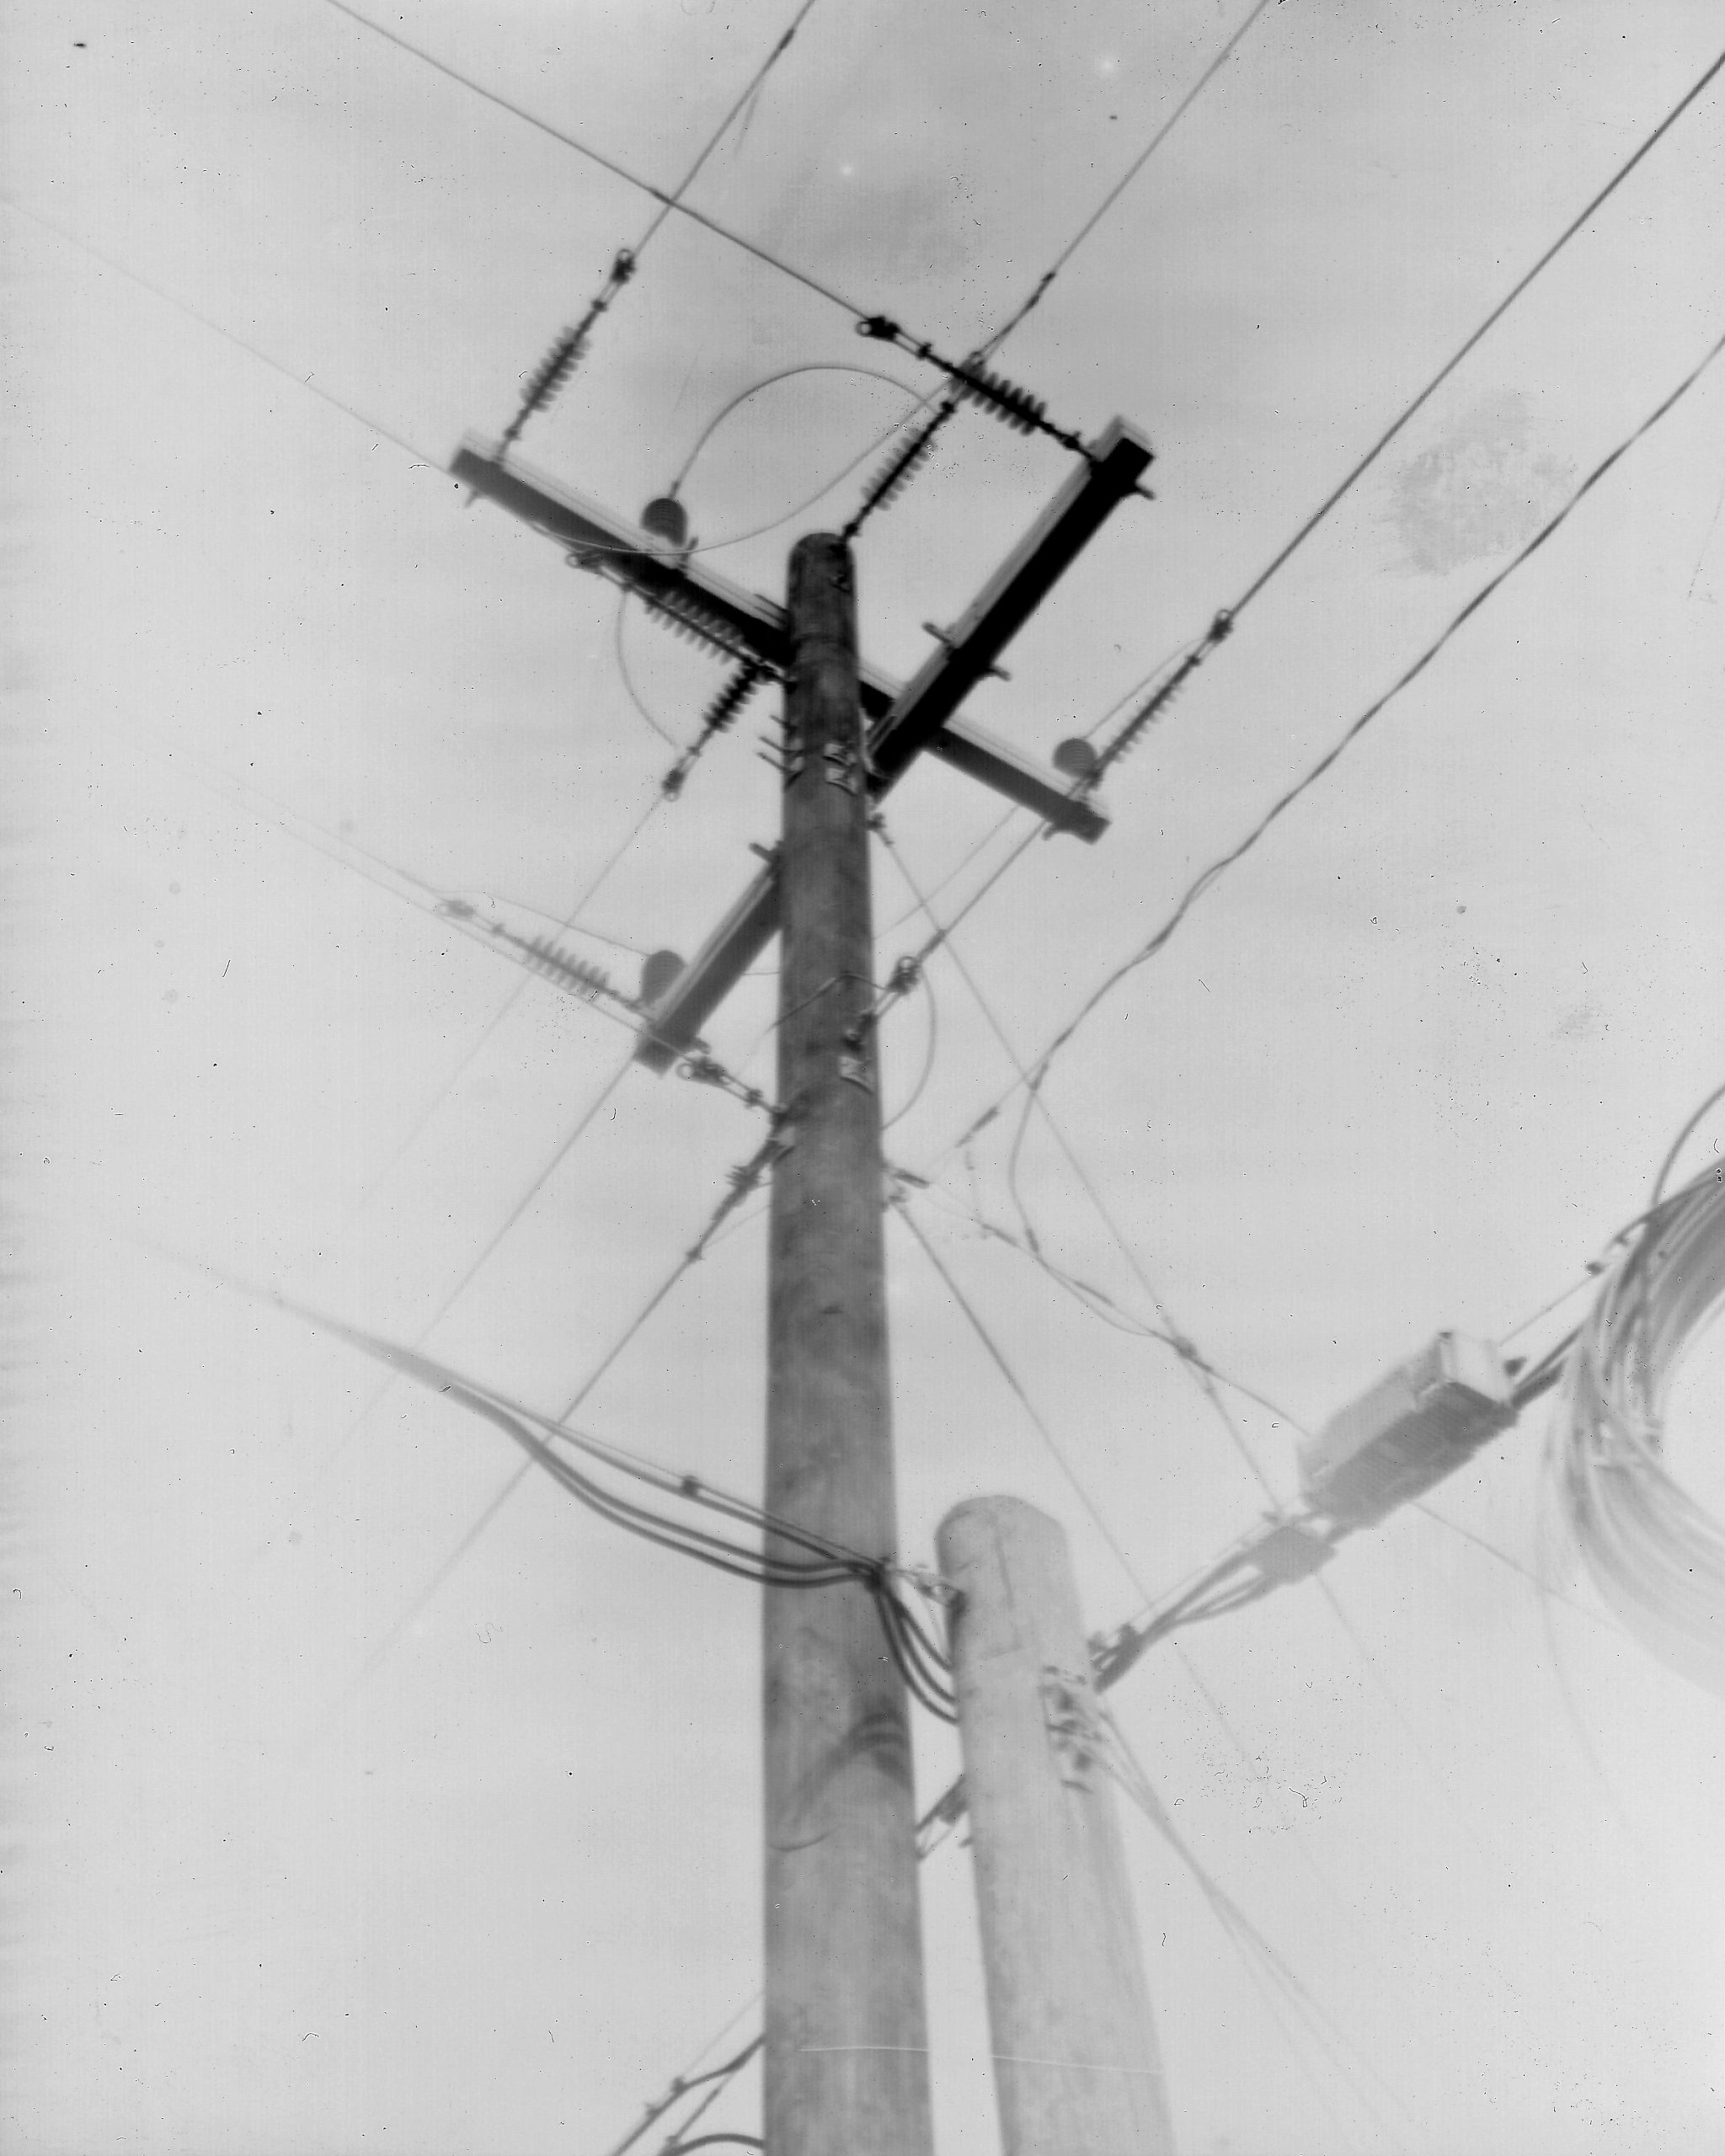
First Photo Scene

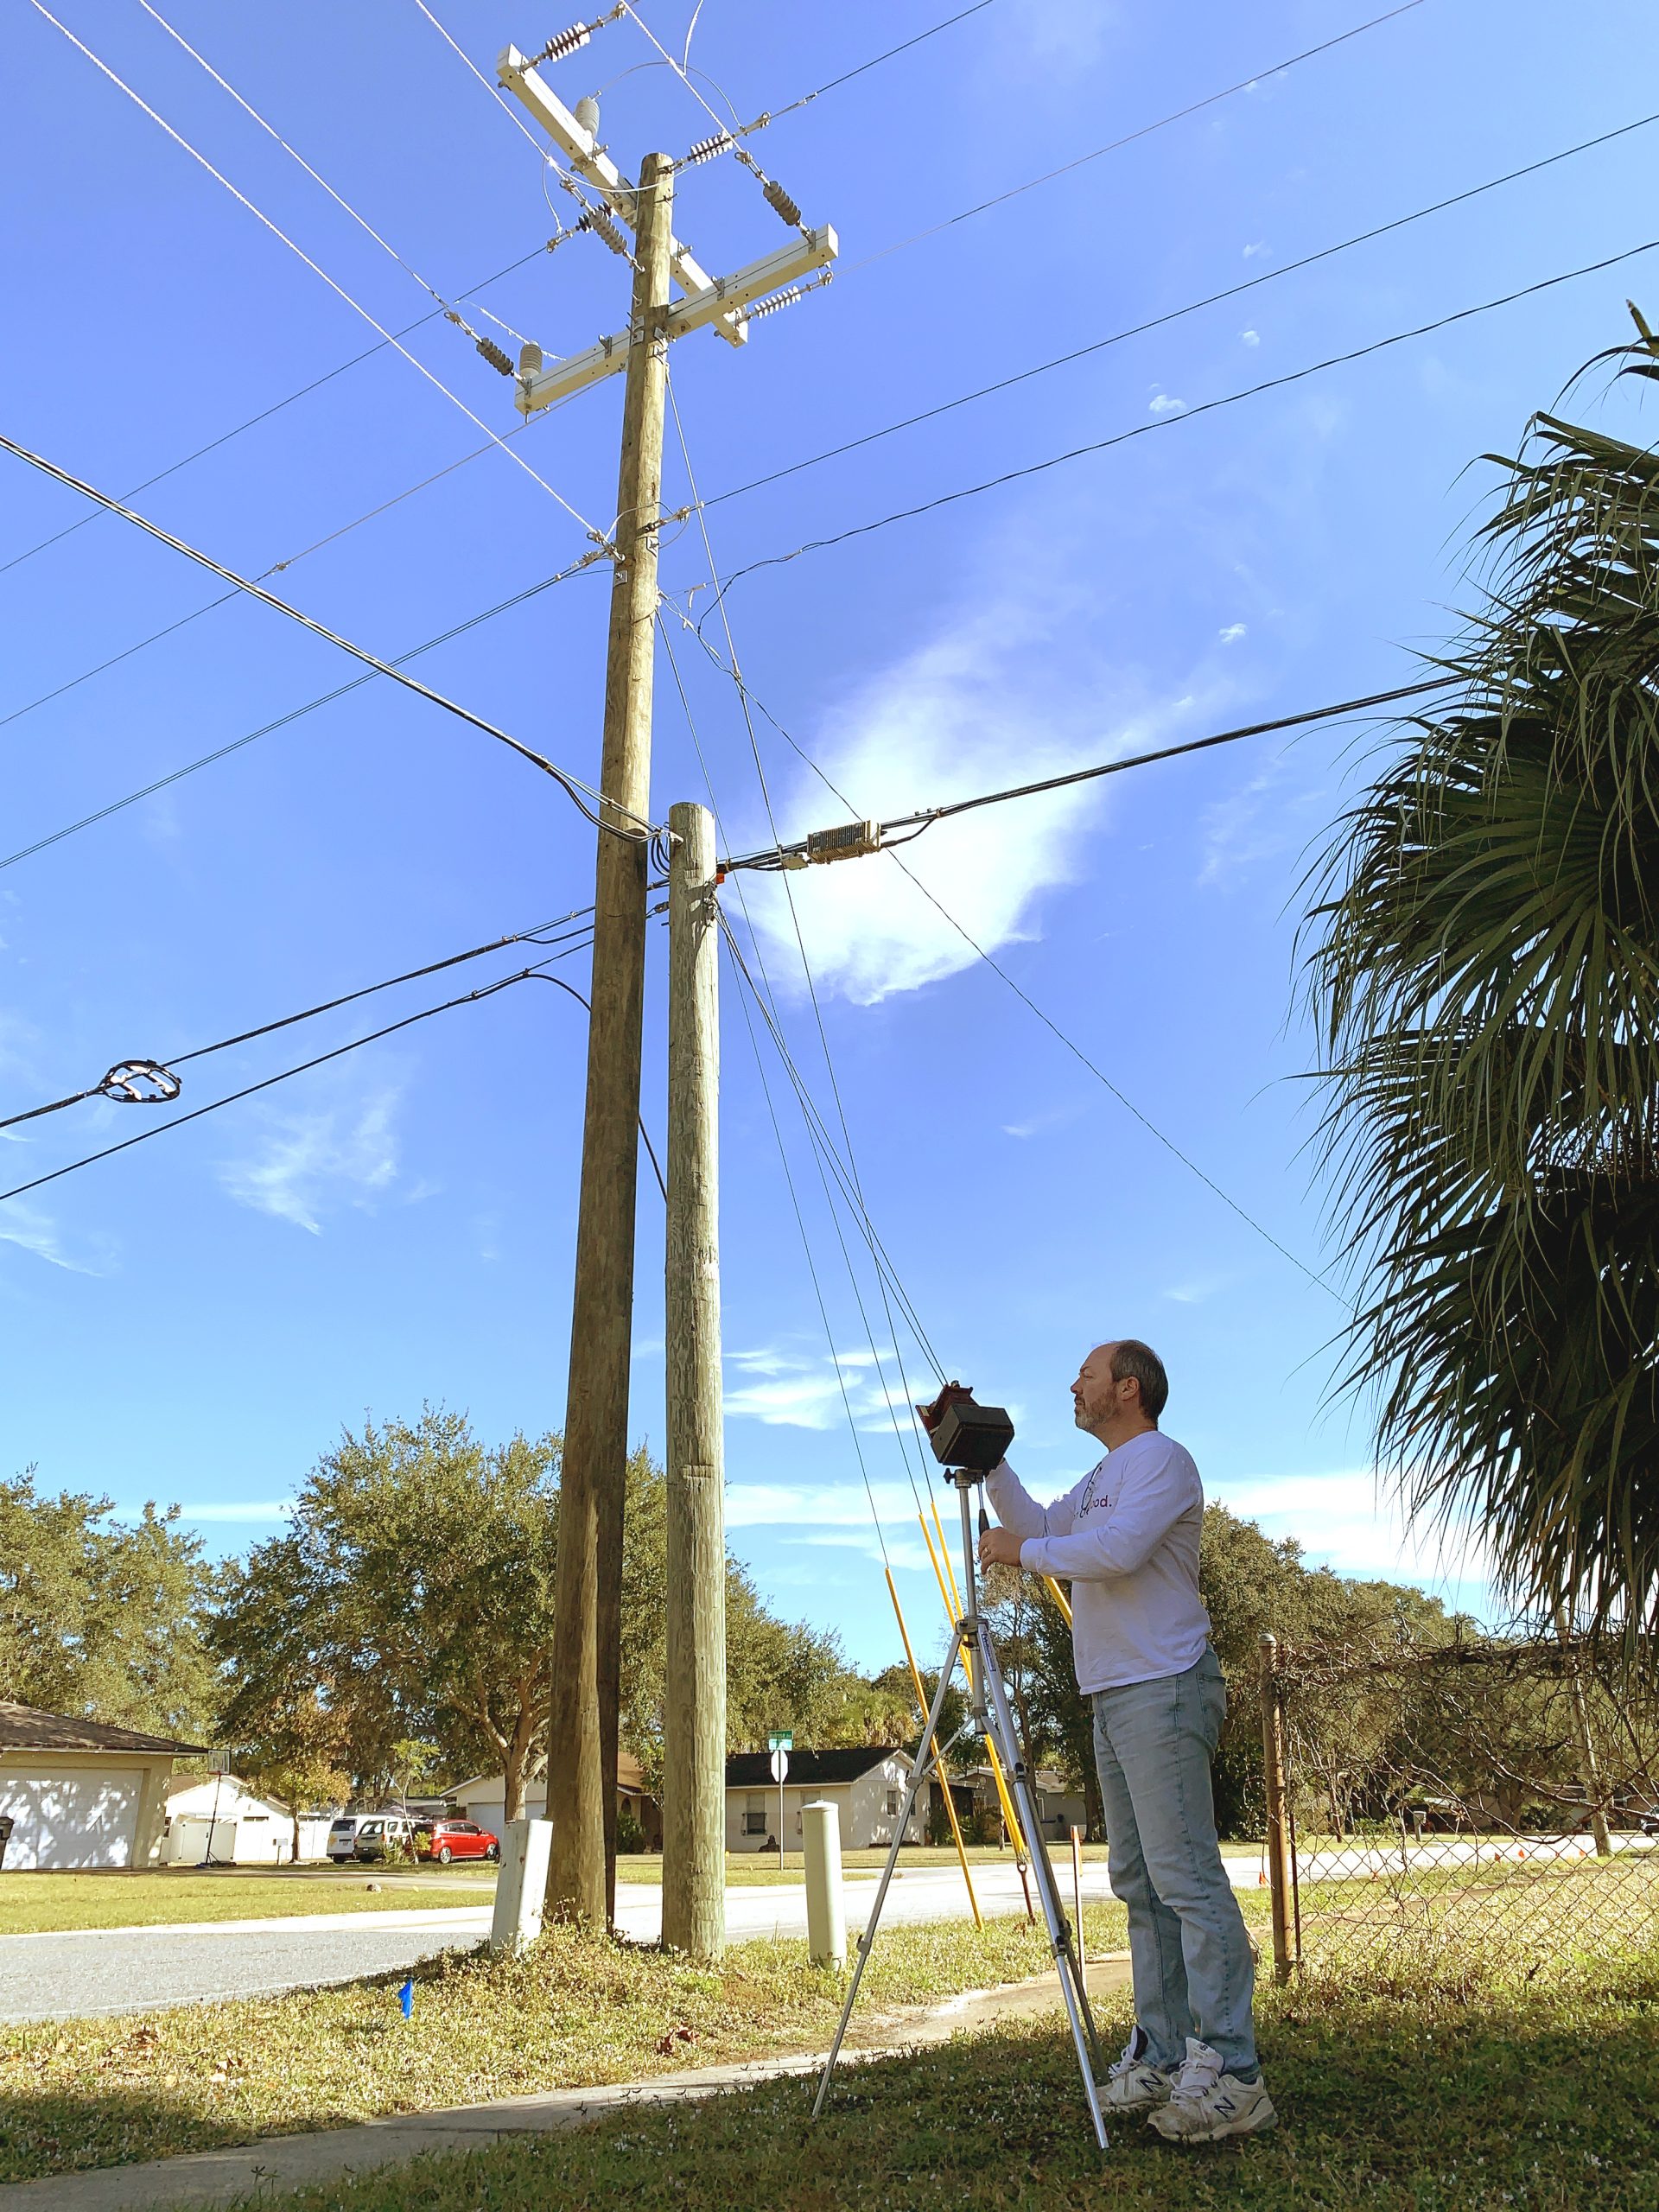
I decided to take my first photo of a power pole near my house. I thought this scene would give me some good contrast between the wooden pole and the bright sky. Plus nothing would be moving in this scene. Other than my camera a bit maybe during my long exposure triggering. Also, this is a very repeatable scene if I really screwed it up and had to do it over again later.

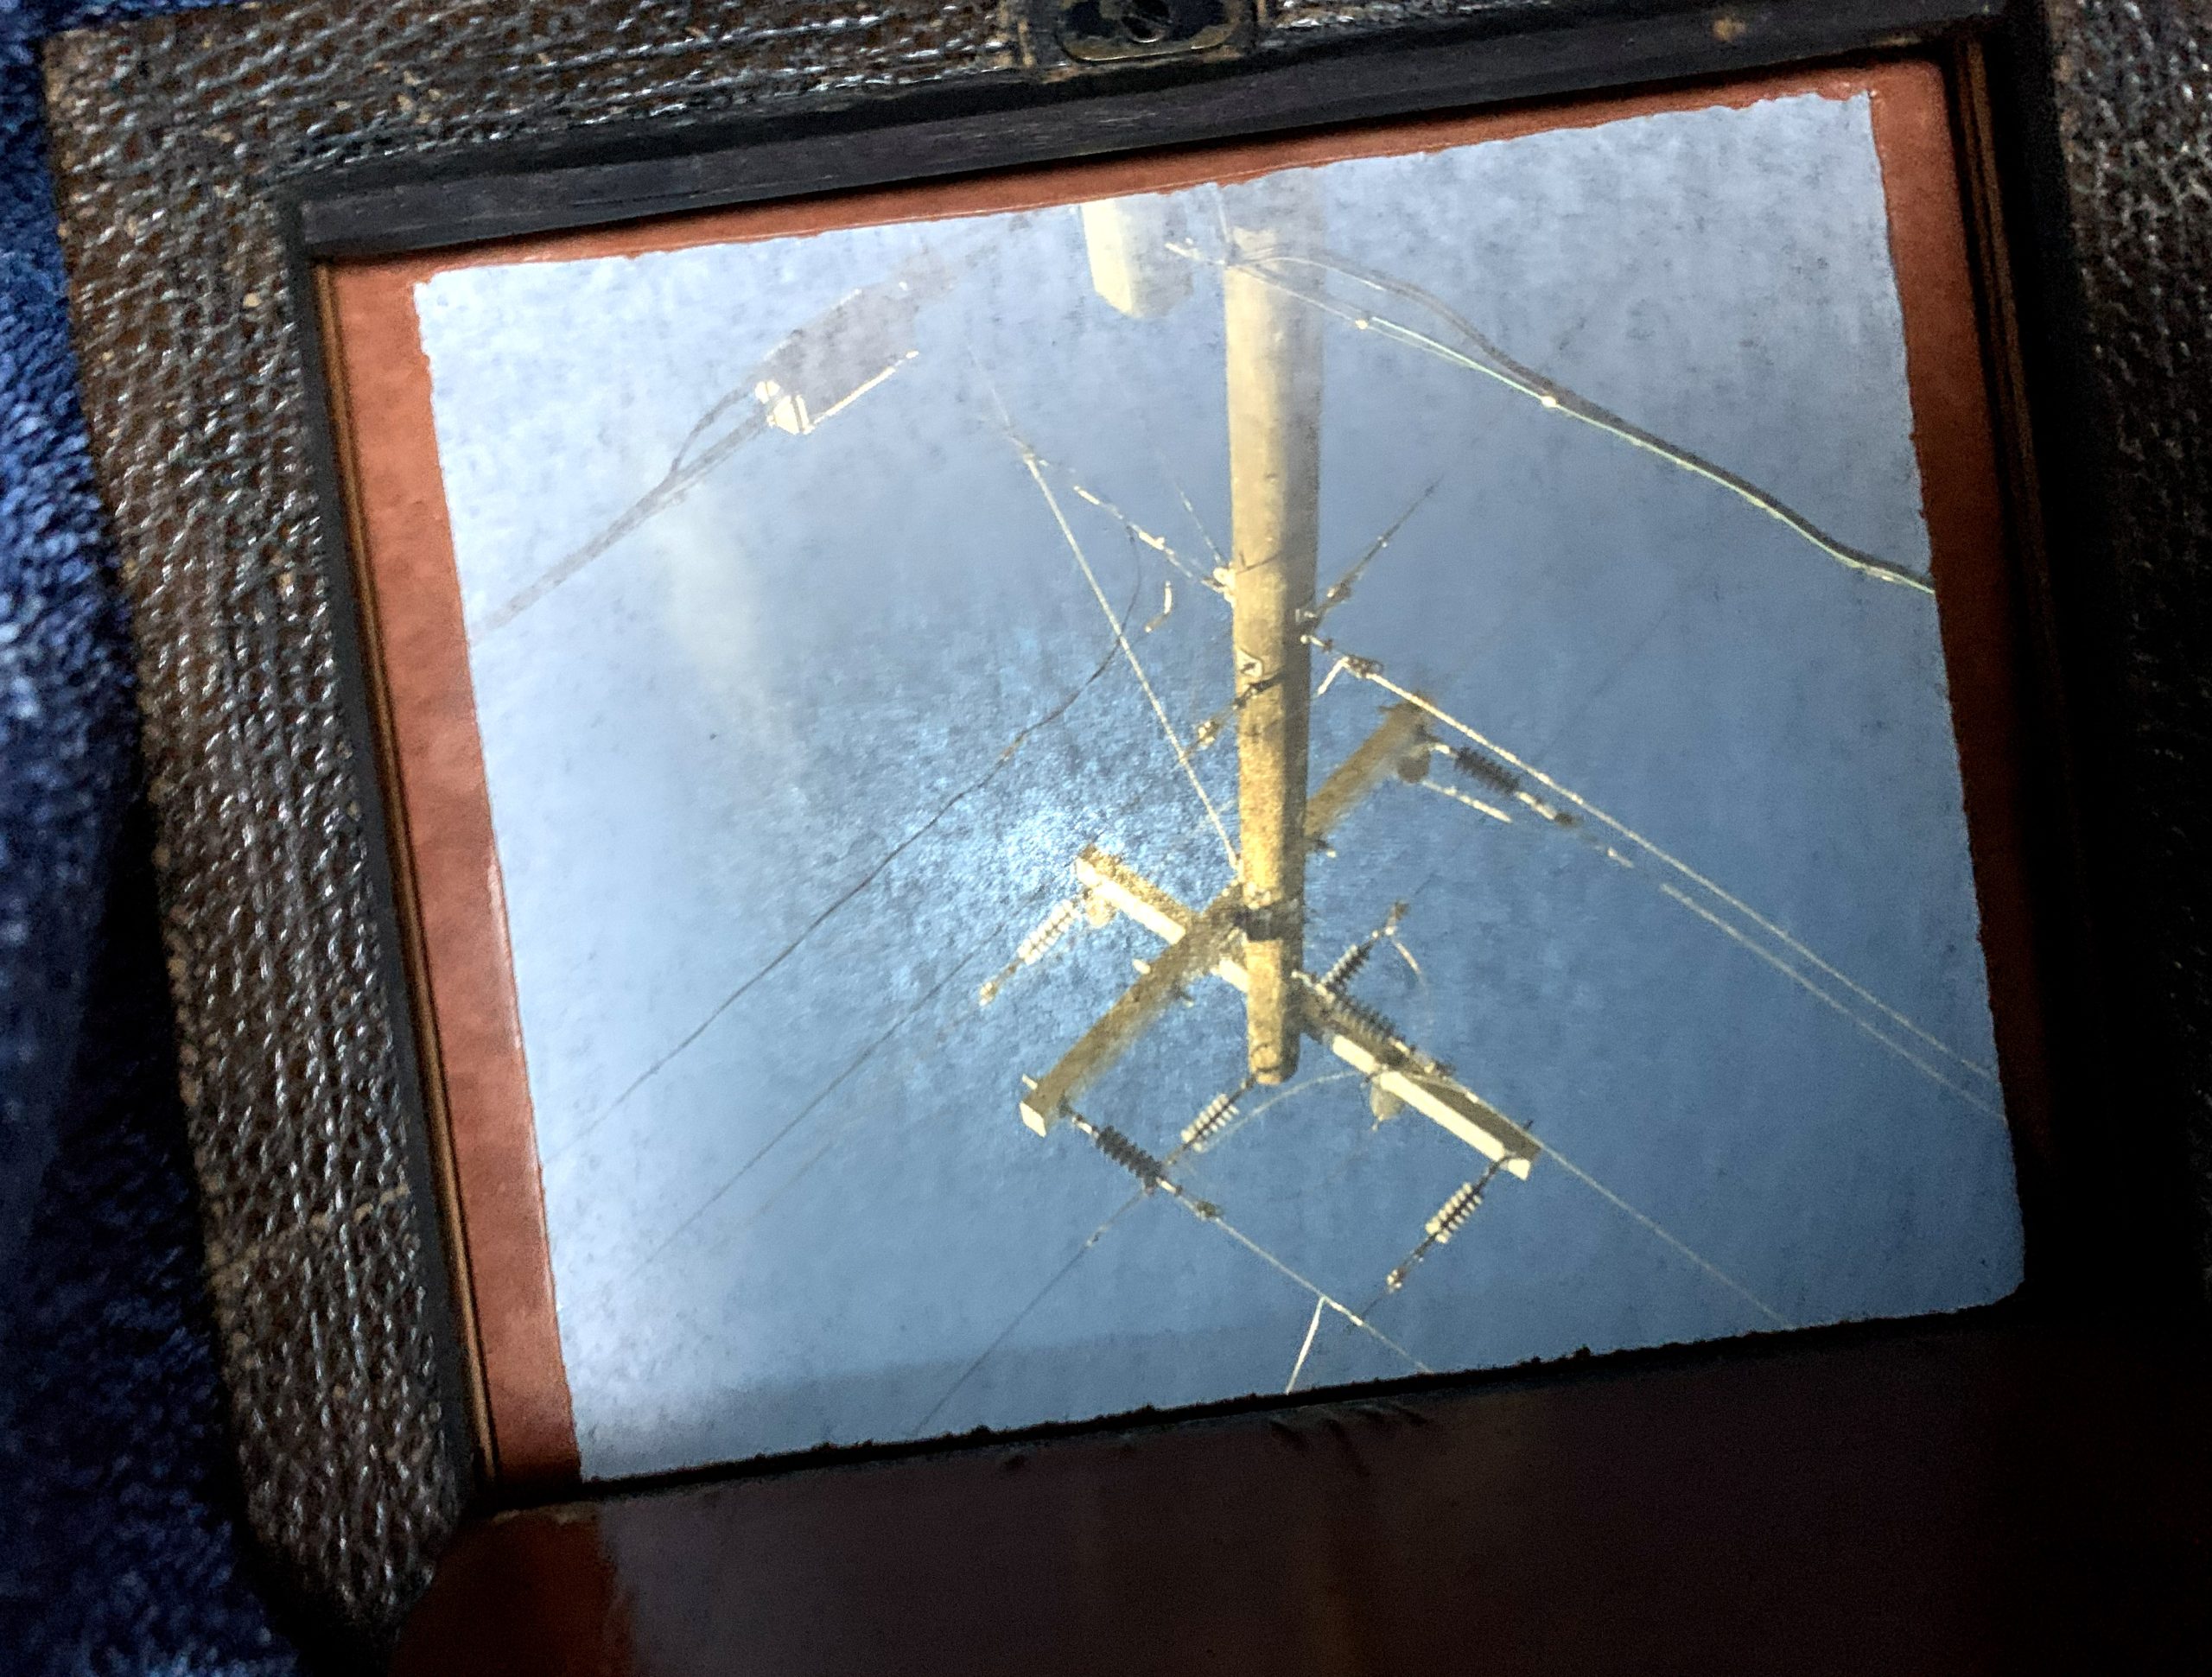
This camera has a cool little optical view finder with a tiny ball bearing inside that doubles as a level. It’s that little copper colored box in the upper right of this image:

This view finder uses a mirror or prism to optically project the scene, although upside-down, so you can frame it up properly. You don’t actually put your eyeball up to it like modern viewfinders. The image is projected pretty clearly onto a glass plate. I really don’t fully understand it. It’s amazing though.

Focus

I used the tissue paper method to focus the image inside the camera.

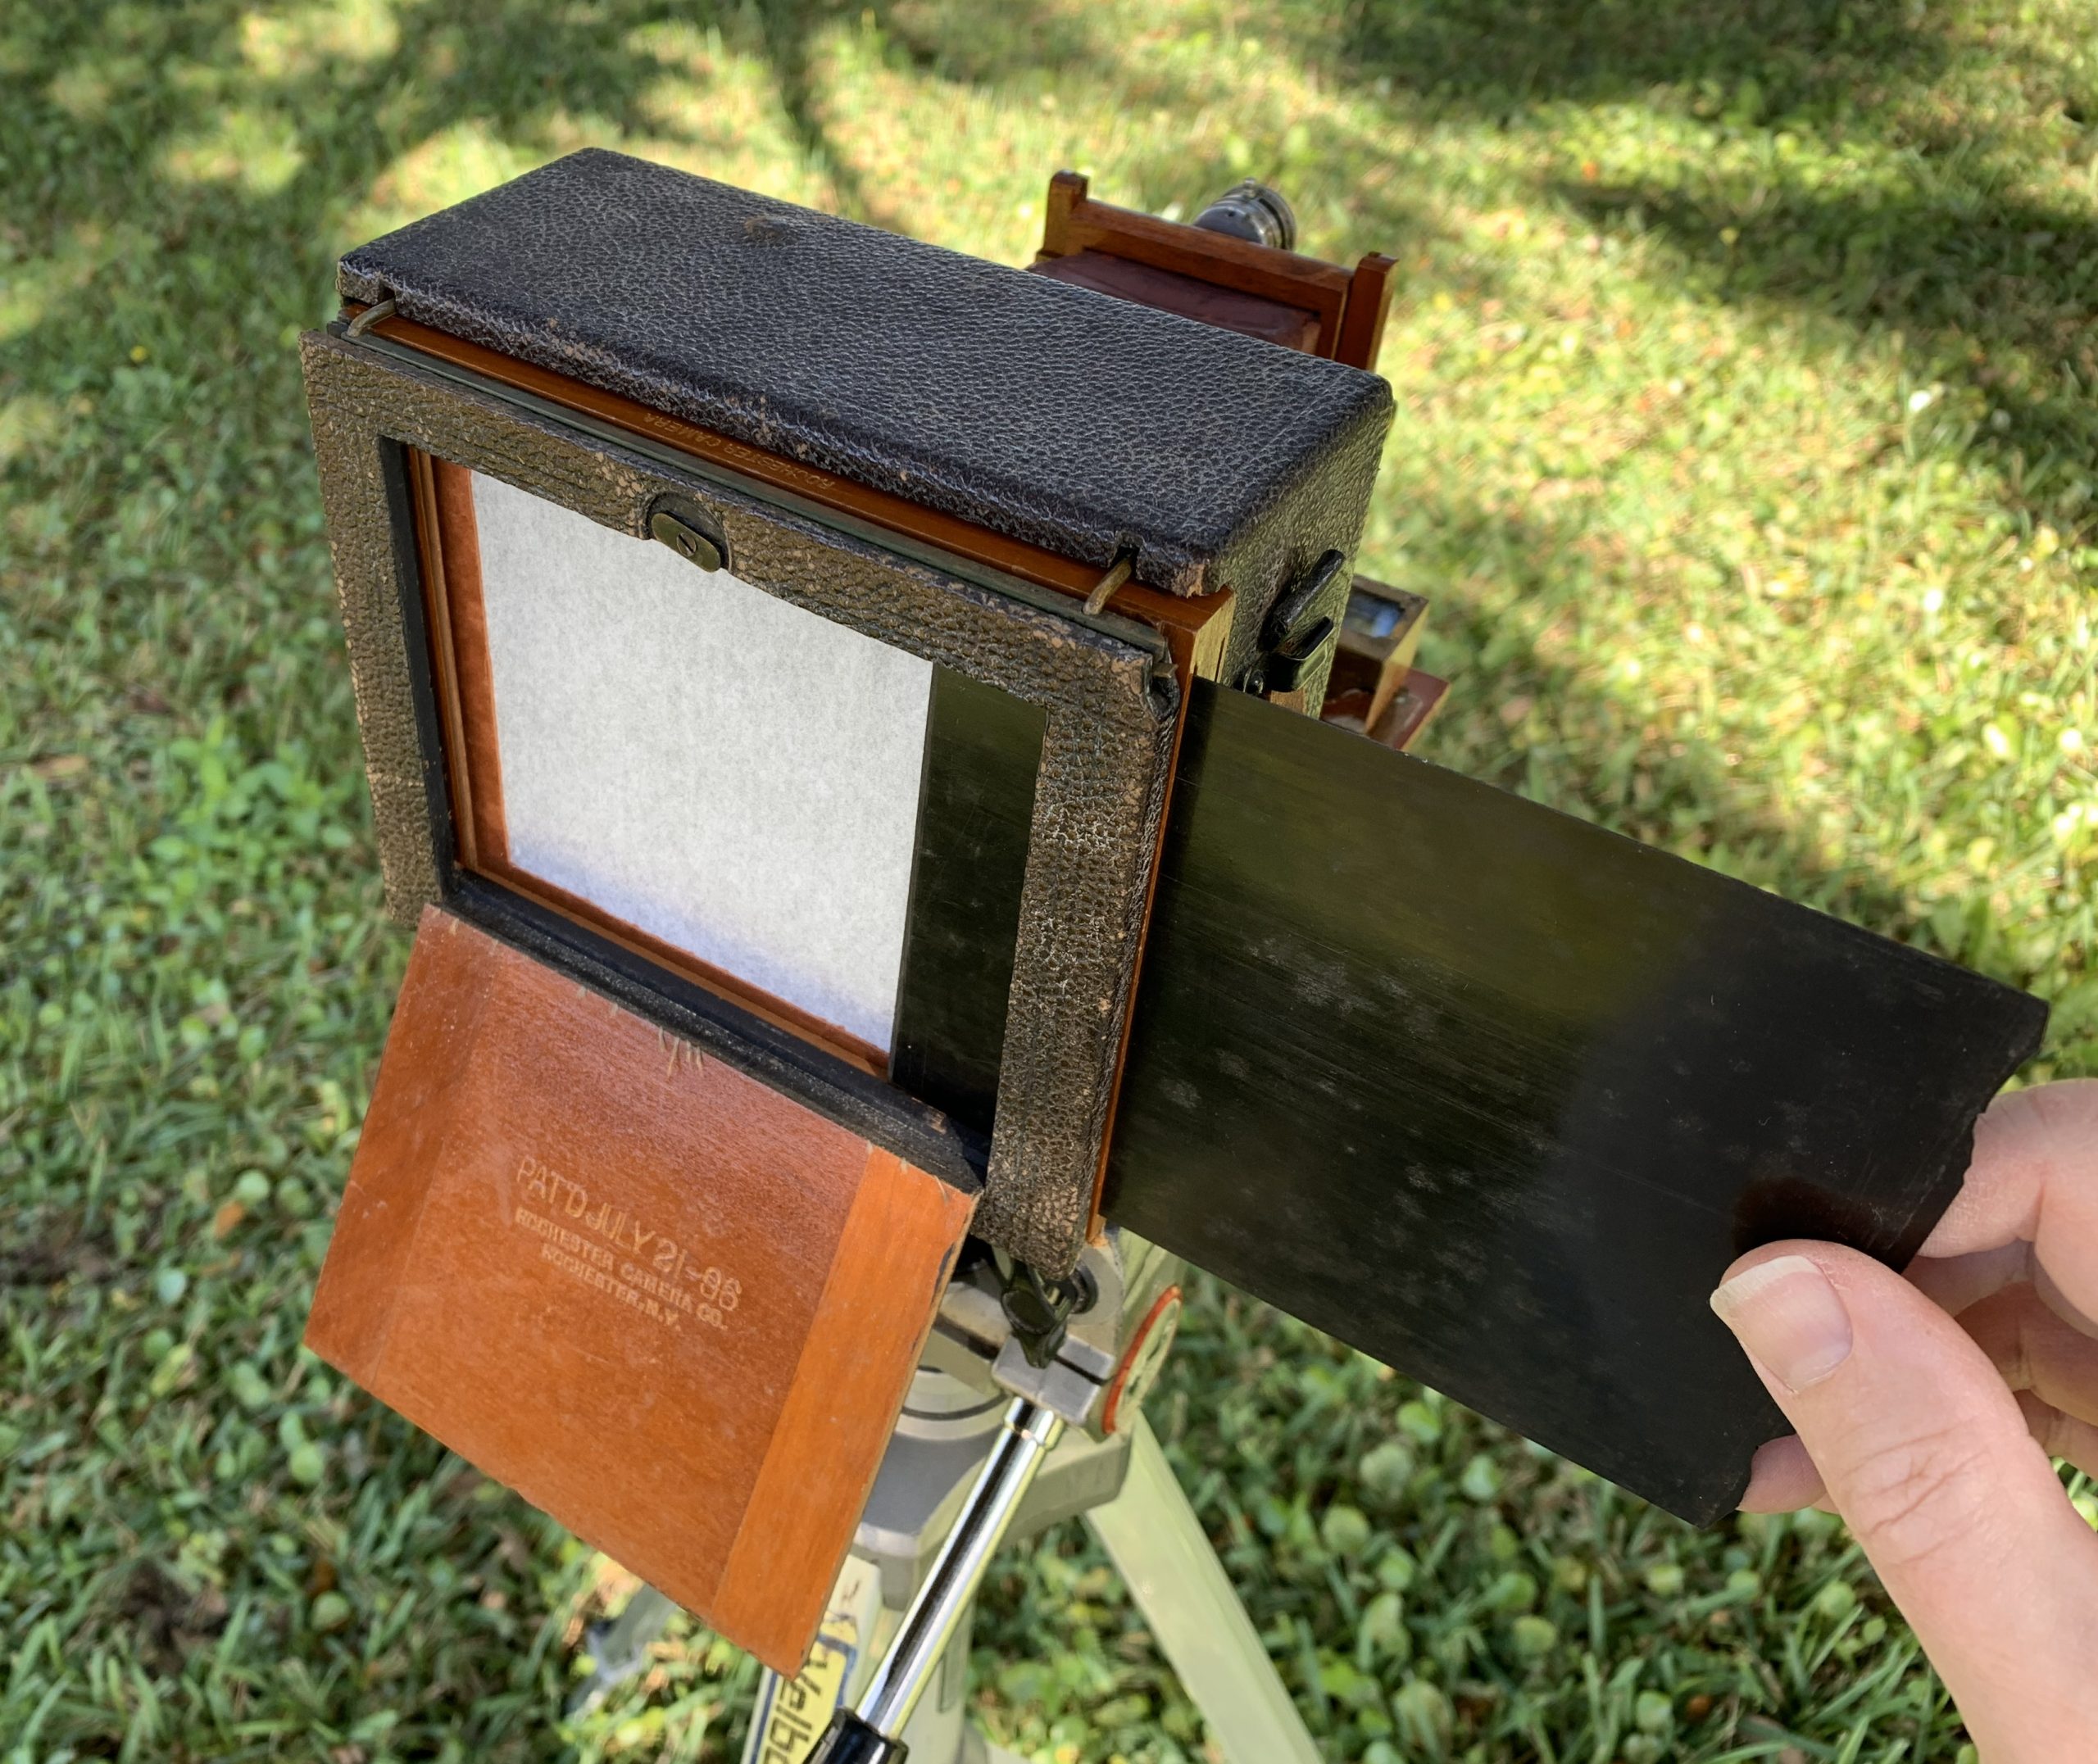
If you place a piece of thin tissue paper into the same plane that holds the glass dryplate, you will be able to clearly see the image being projected by the camera lens onto the other side of the tissue paper. It’s like a little movie projector on the back of the camera!

Yes, it projects upside down. That’s actually how lenses work.

You really have to block out all sunlight to clearly see the focused image on the tissue paper. And that totally explains why old-timey photographers would duck under a black velvet curtain to look into the back of their cameras!

Exposure

I used a free light meter app on my phone to tell me how long to expose the glass dryplate based on the current lighting in the scene, the ISO rating of the glass dryplate, and the f-stop, or iris opening, of the camera lens.

You basically just show the light meter app the amount of light in your scene by using your phone’s camera. And then you set the ISO value of your film. Then you can either set the exposure time or the f-stop iris value and the app will calculate the remaining variable.

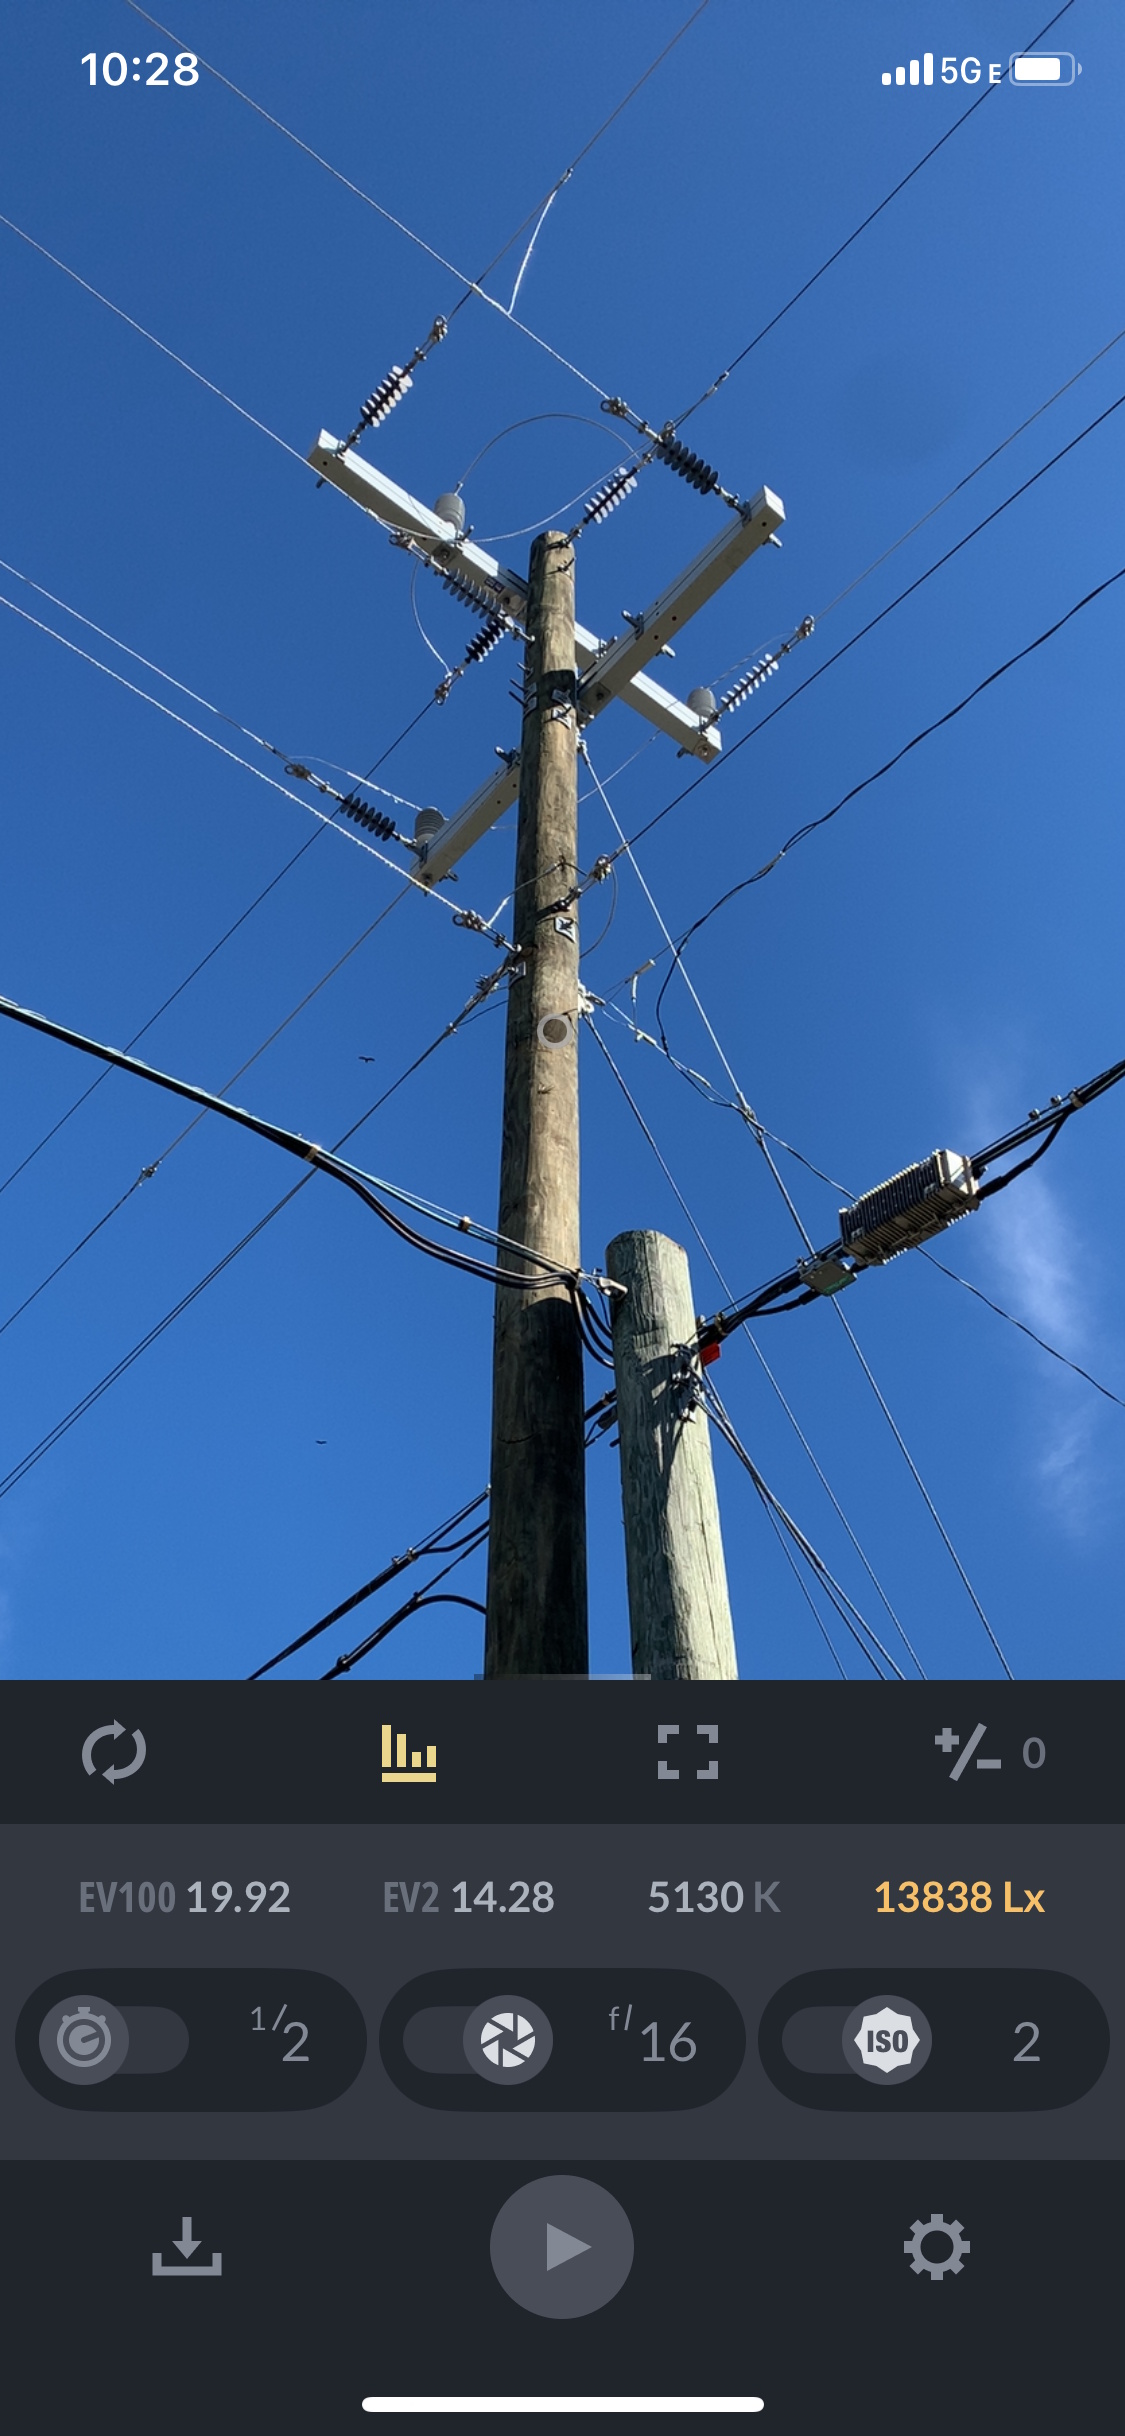
In this scene my film was ISO 2 and so I adjusted my f-stop to 16 in order to get a half-second of exposure time which I could just manually count off in my head. It did not have to be perfect. The film emulsion layer on the glass is slow so if I gave it a little extra light, it won’t actually overexpose it and ruin it. I could also compensate for some over or under-exposure during the development process. Which I performed myself.

In my case I also varied the lighting in the scene a little bit by waiting for the sun to come out from behind the clouds. I wanted this first test photo to have high contrast, so I did not want to take this photo under cloudy lighting conditions.

Developing

This was my first time developing photos, so I was pretty nervous about it. But it turned out to be not terribly difficult. I bought the trays and the developer chemicals and the fixer chemicals online at B&H Photo . I watched a few of the instructional videos from the Zebra Dry Plates company . And it tried it and it worked pretty well.

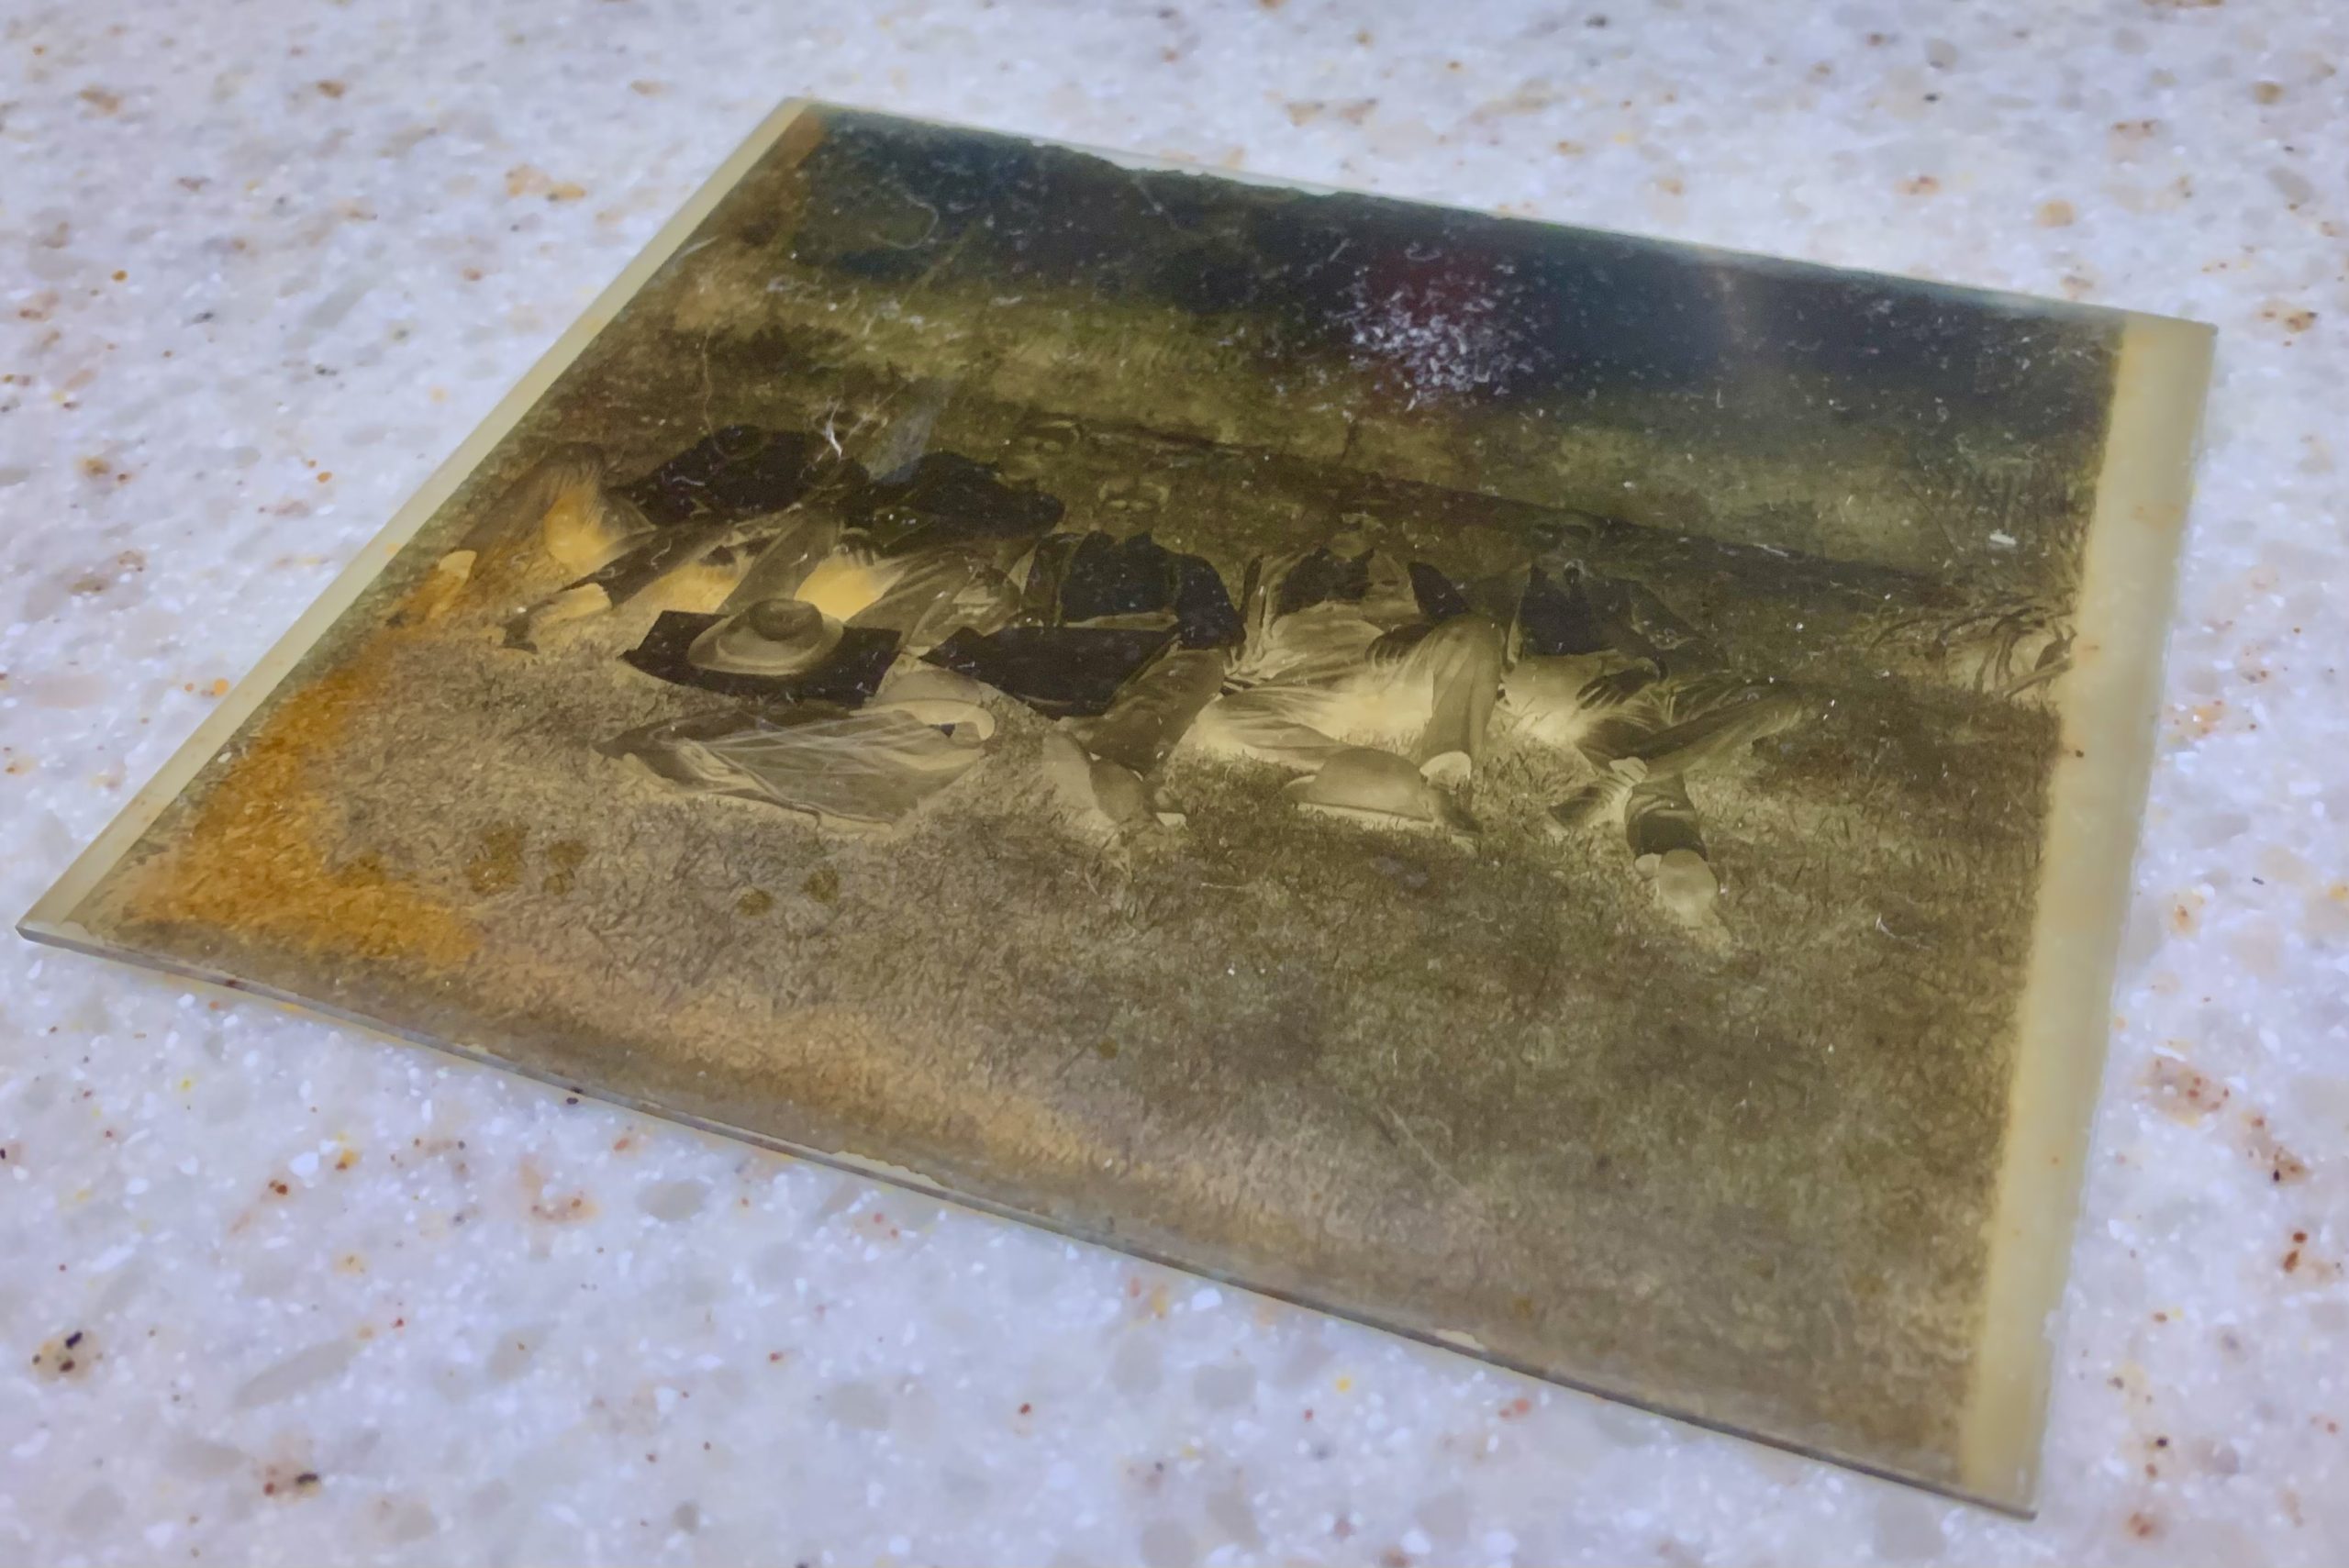
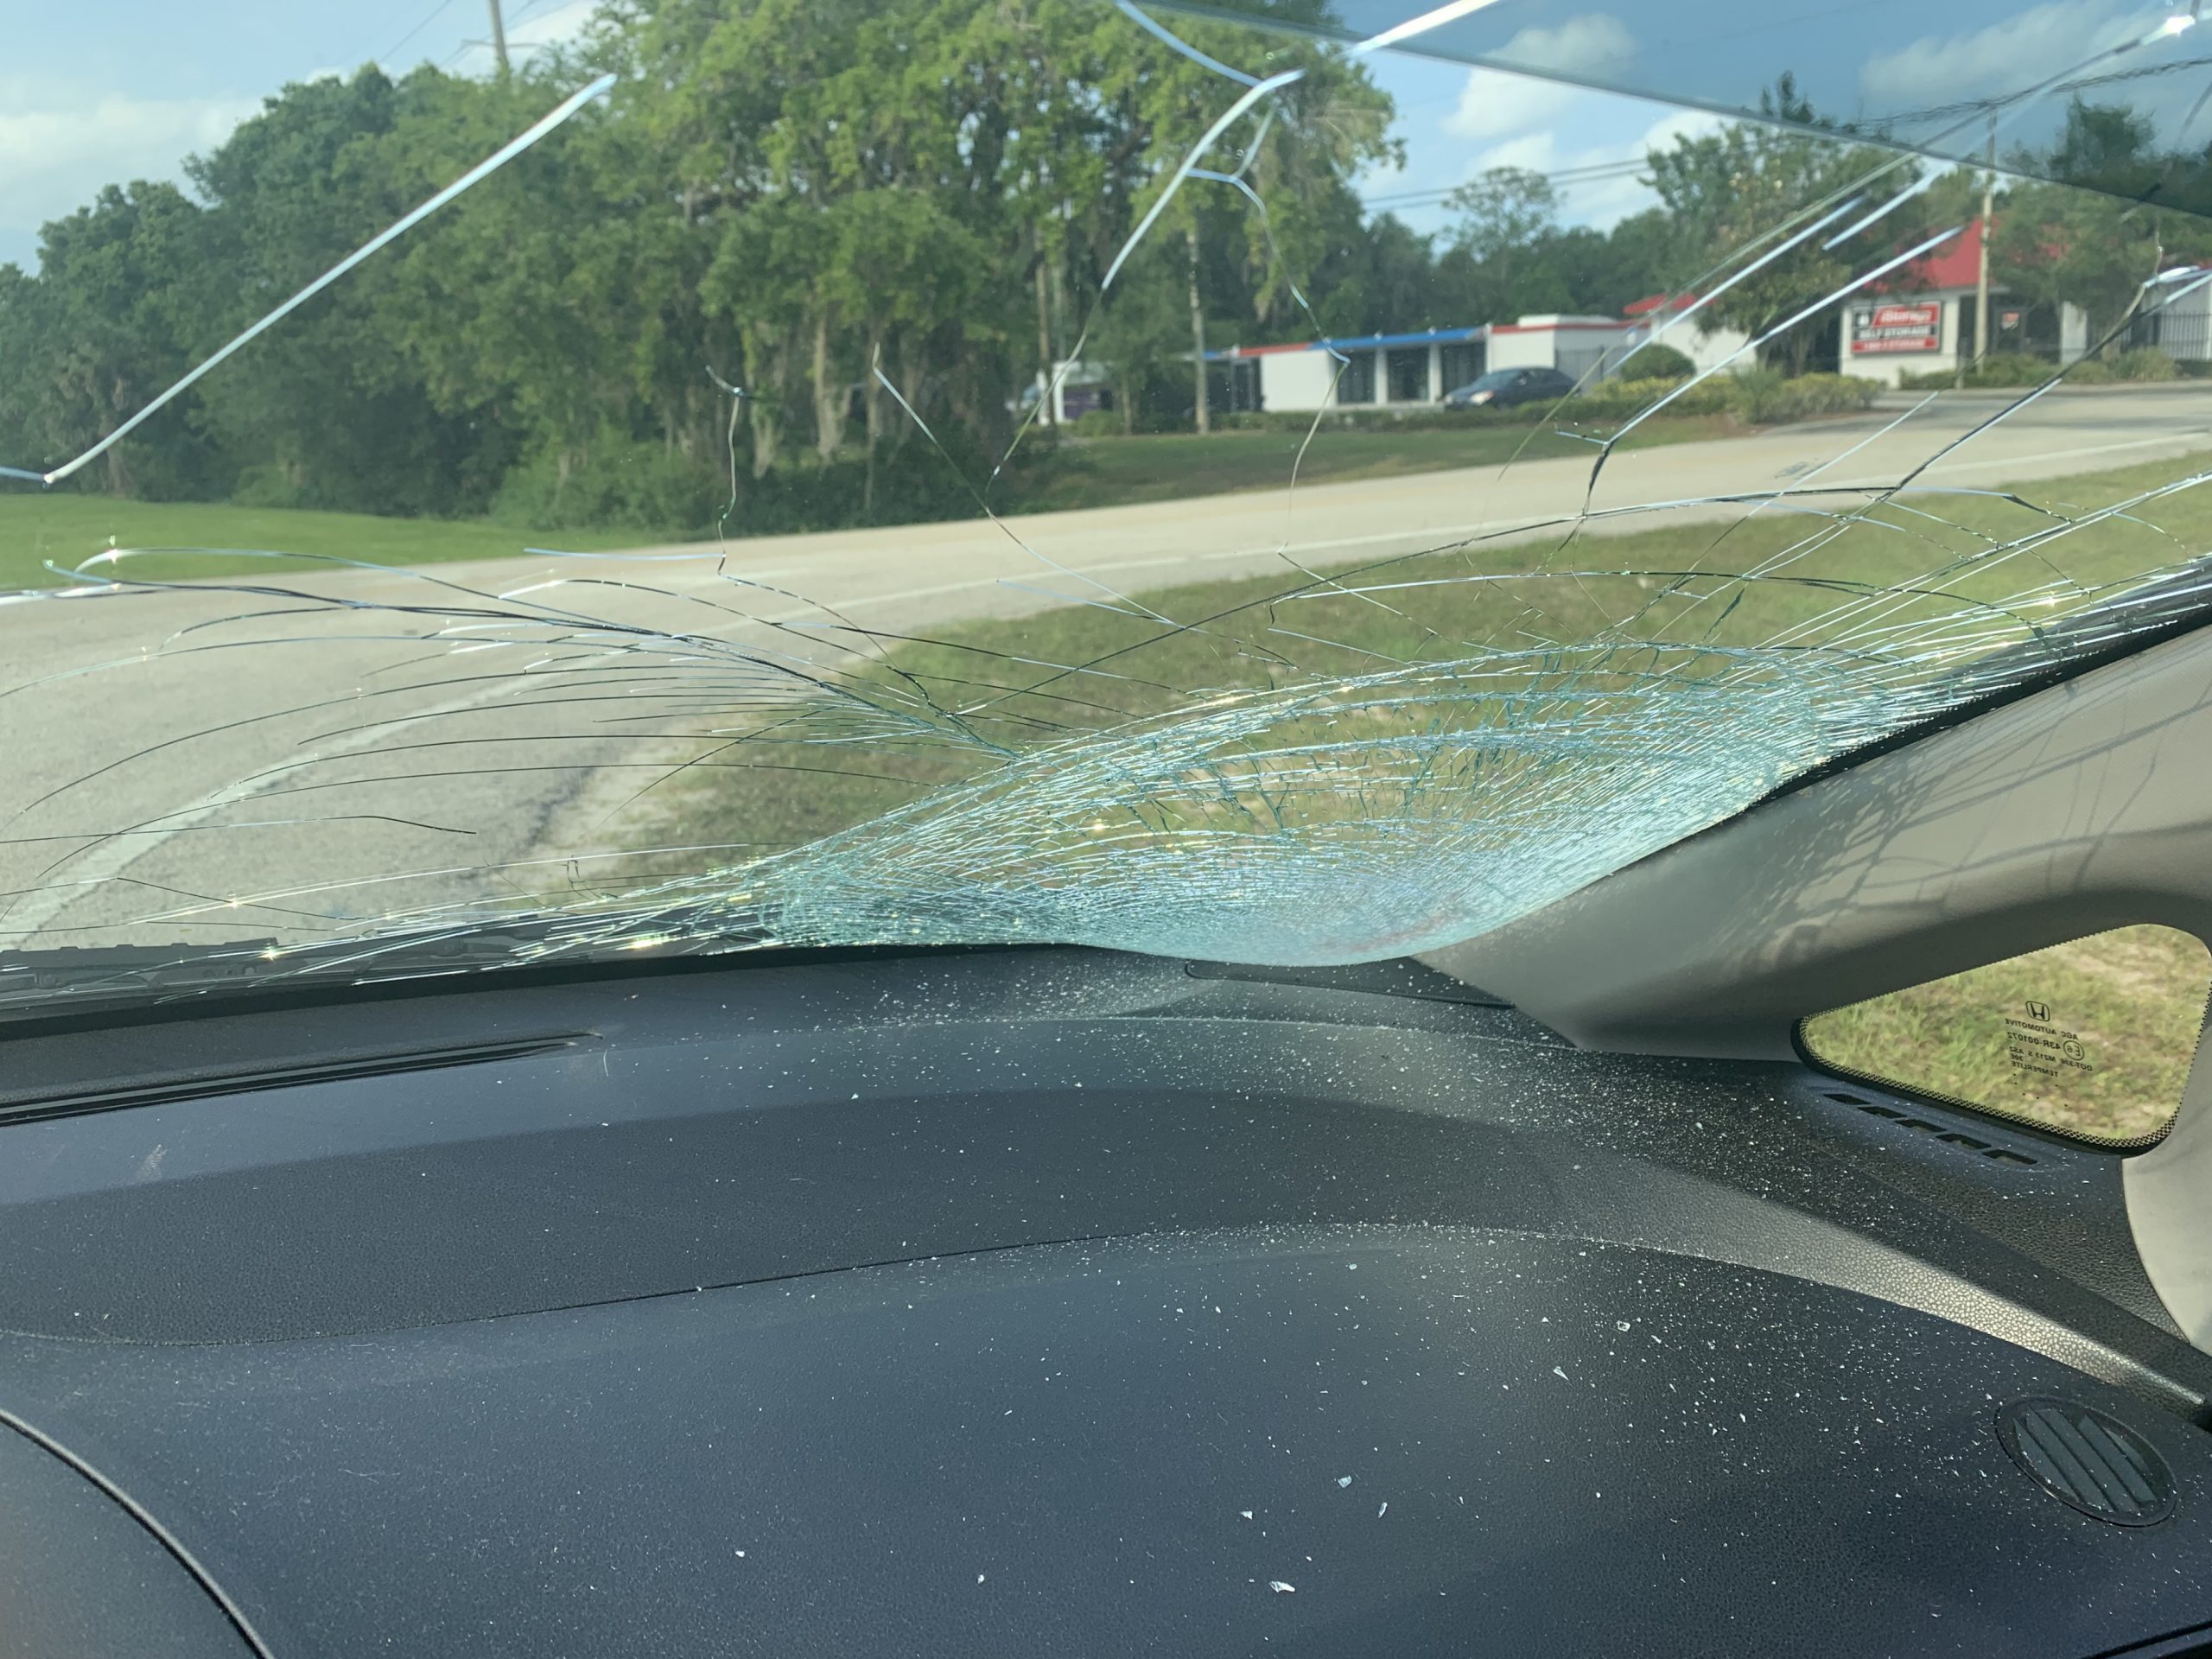
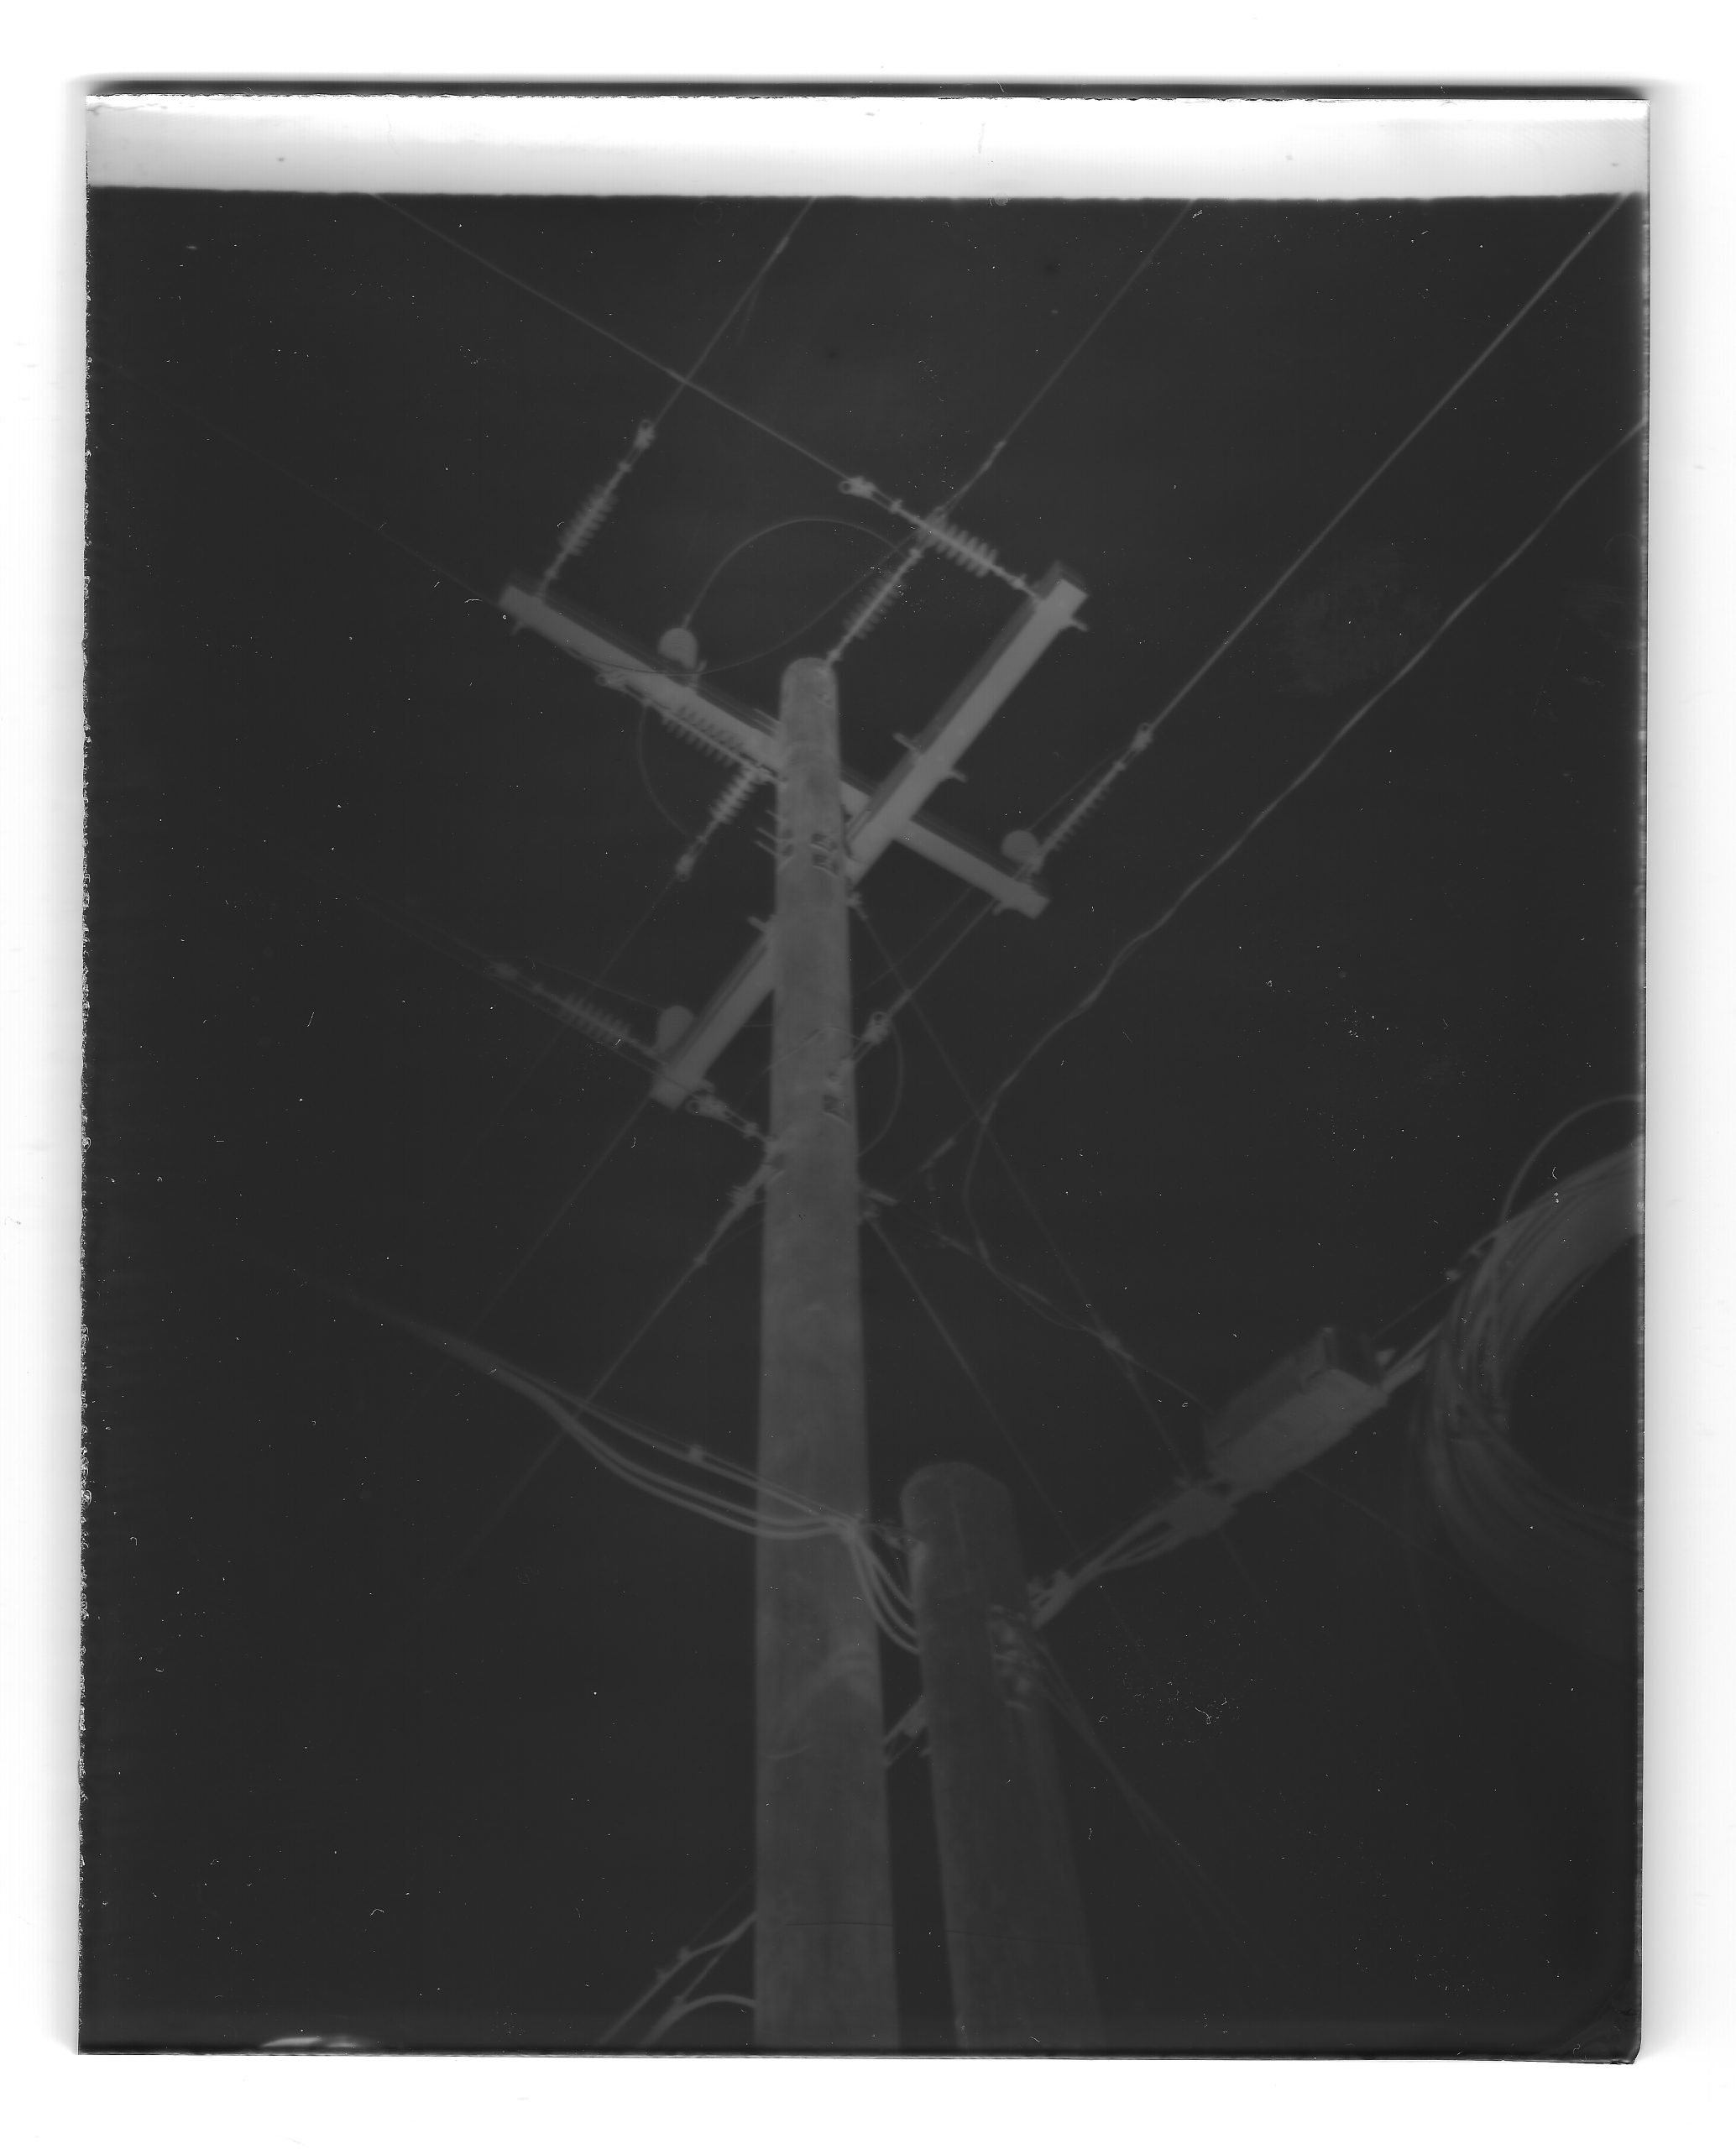
Once developed, fixed, and dried overnight, the glass dryplate showed a pretty nice negative image of the scene, like so:

Scanning

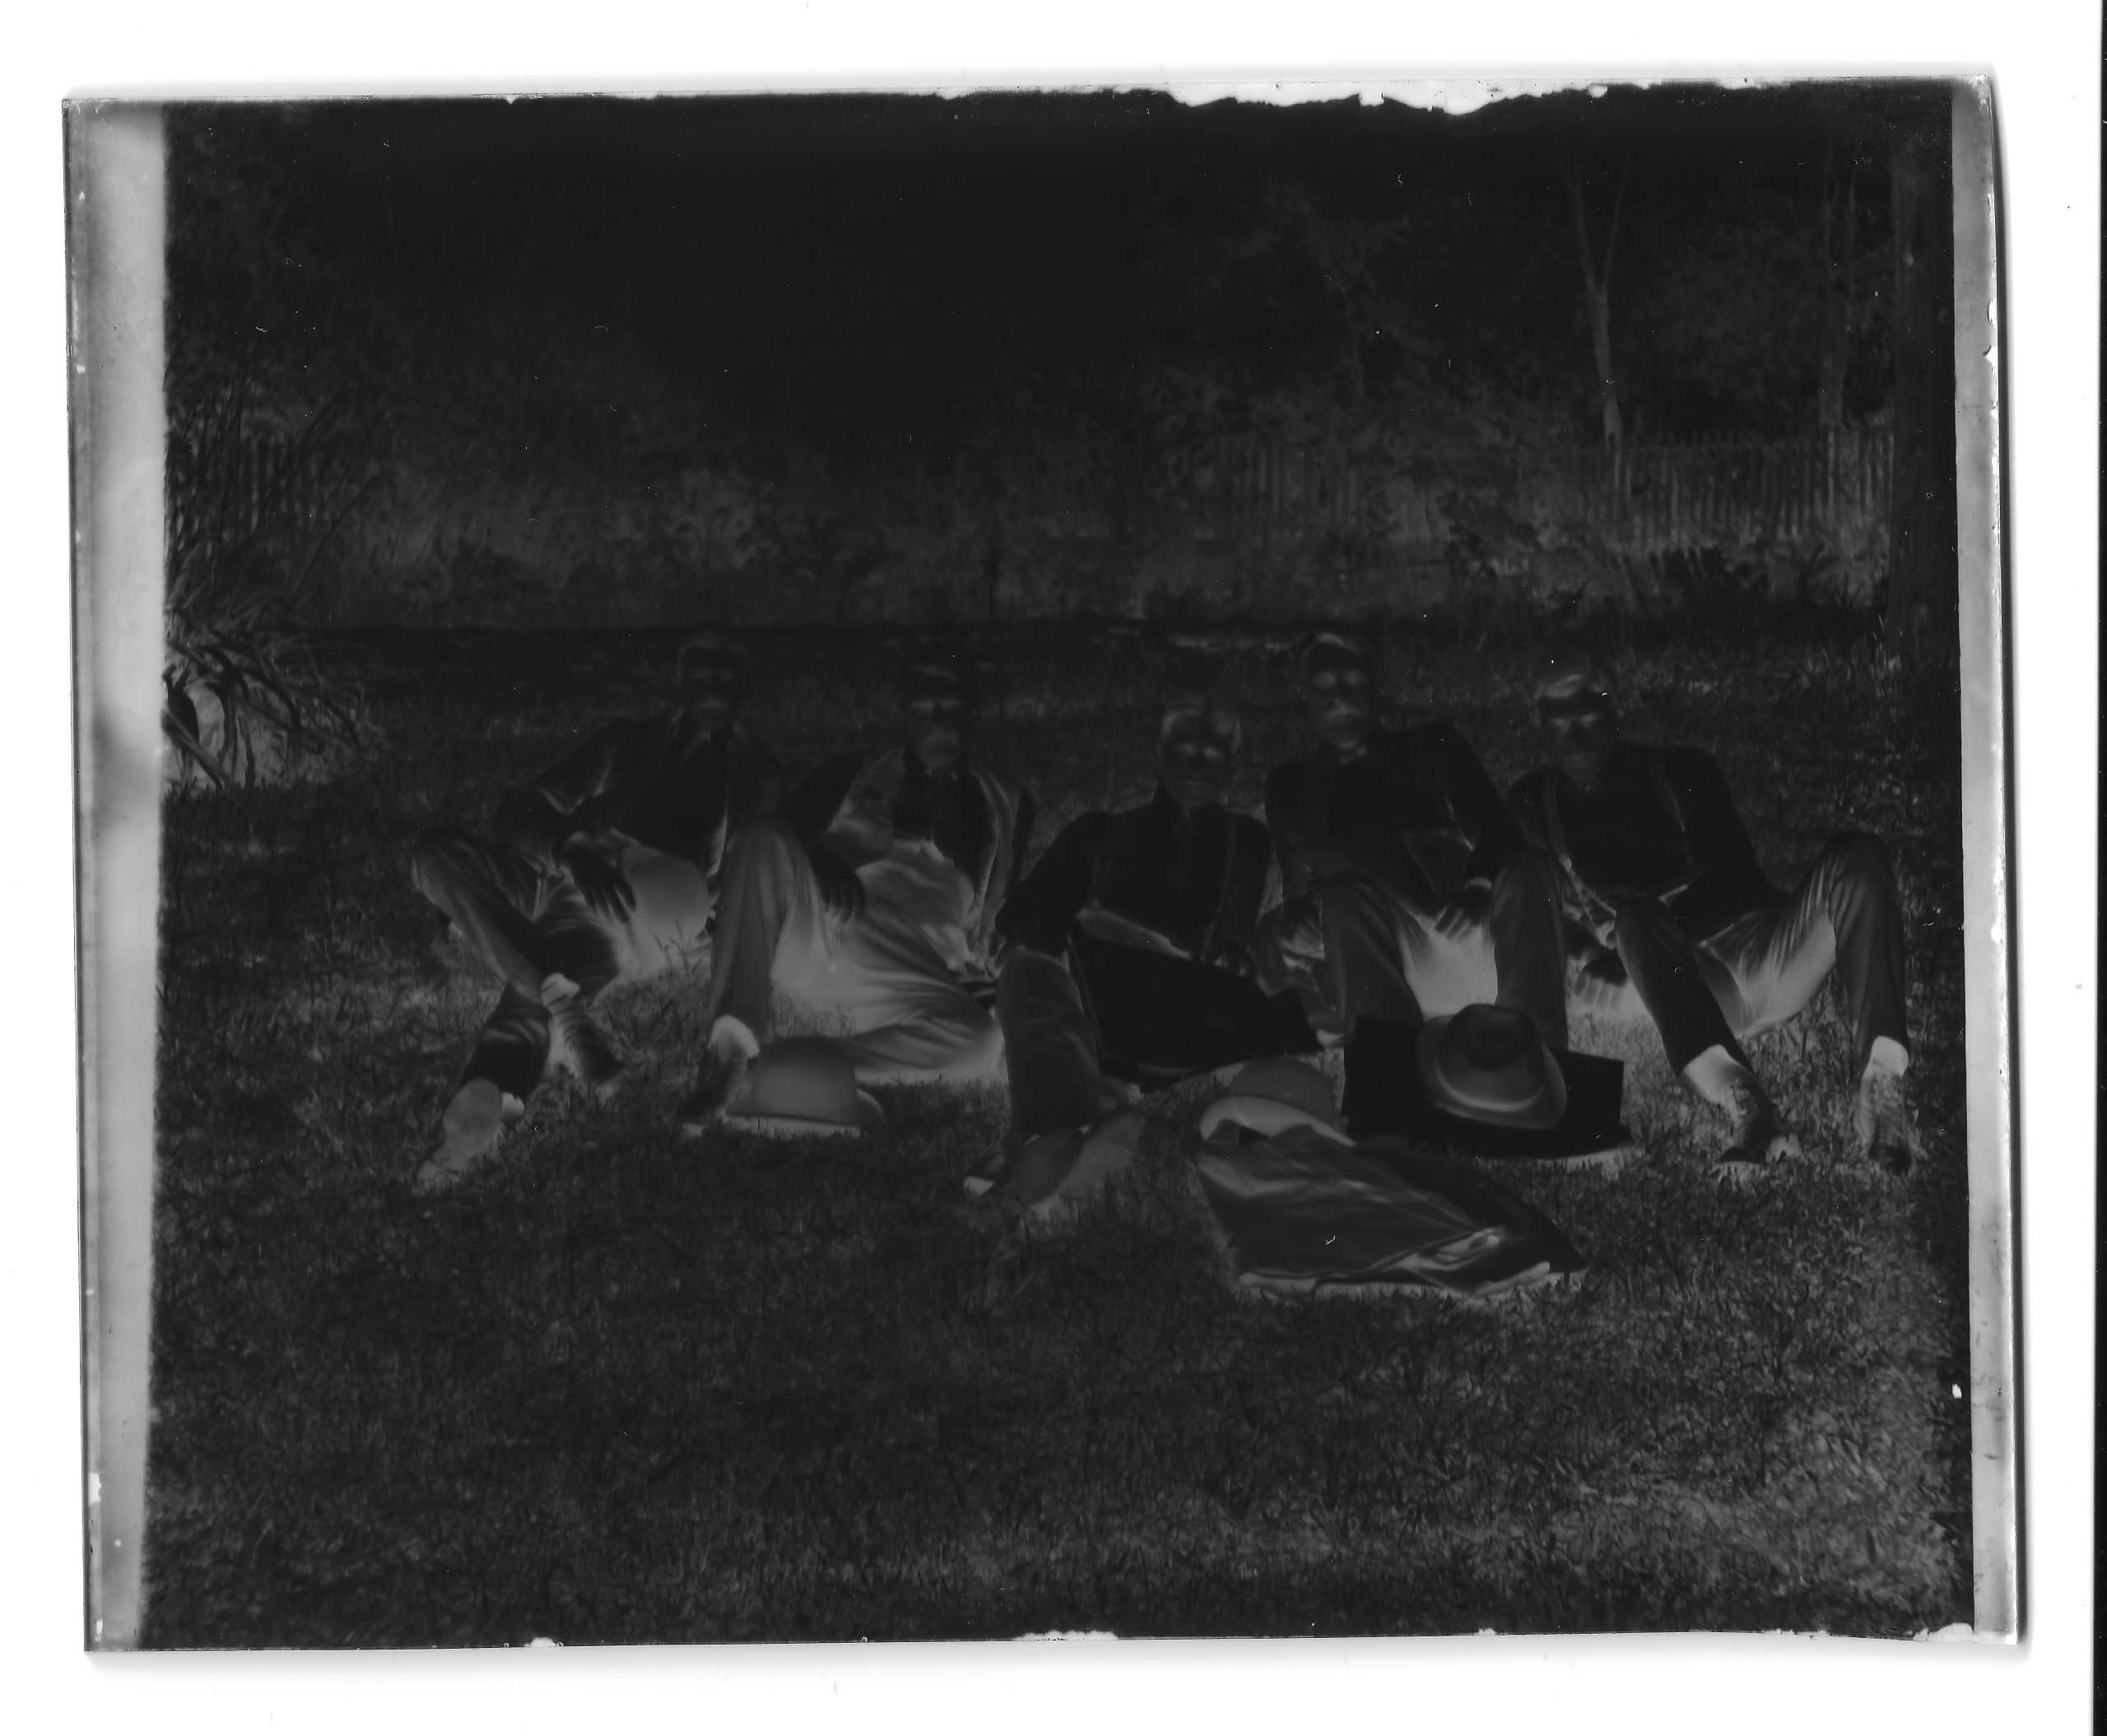
I then scanned it in my flatbed scanner at high resolution like so:

Correcting

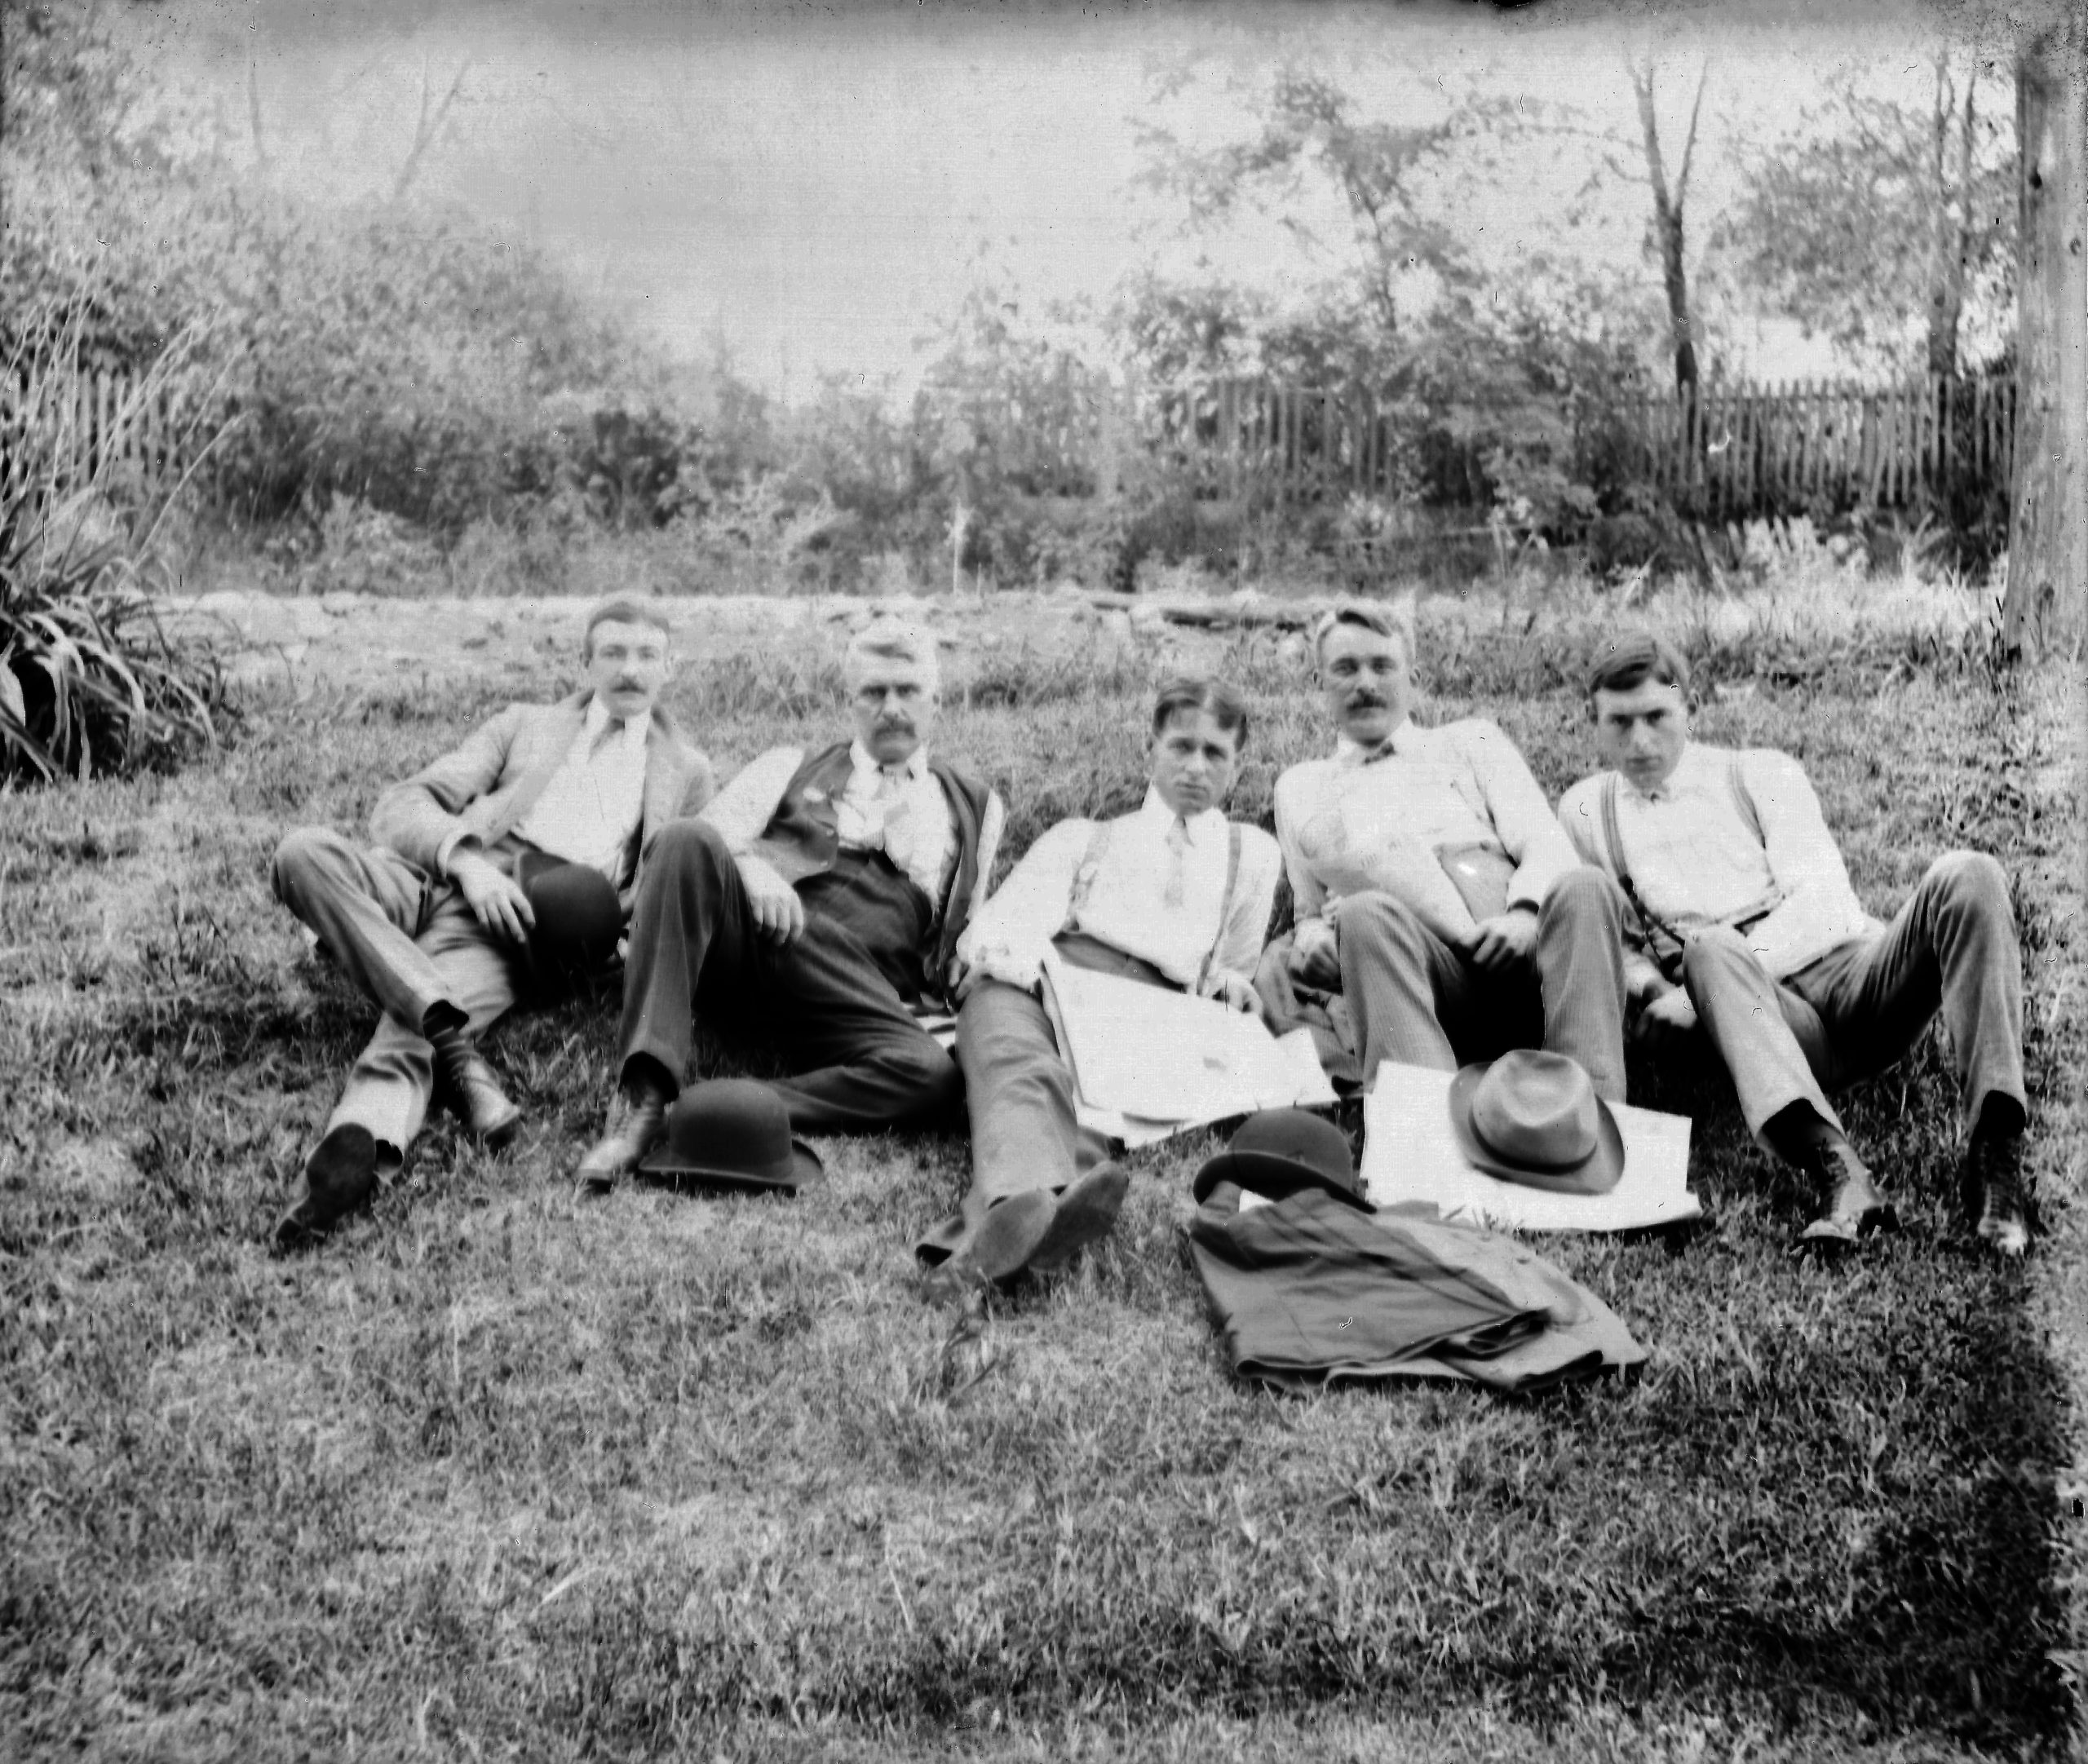
And then I used my favorite free Photoshop clone, Paint dot net , to invert the negative into a positive and then to stretch the levels to give it dark blacks and light whites, like so:

I’m really quite pleased with my first old-timey photo. The small dust-like imperfections in the emulsion are real and are very similar to real photographs from that era. The fading or vignetting towards the edges is either due to the old-timey lenses in the camera, or is possibly due to the non-perfect hand-crafted light sensitive layer on the photographic glass plate that was used to capture the light. And that’s also actually not that uncommon for that era.

My first photo is a little bit blurry, which is also not uncommon for this old-timey technology. There’s some chance that my focus was a bit off. But there’s even more chance that the camera shook a bit during my manual triggering of the half a second exposure. For future photos, I will see if I can find a remote trigger to remove the possibility that I’m shaking the camera during triggering. And I also have an idea about how to fine tune and perfect the focusing of this camera.

Thanks!

So what do you think I should take an old-timey photo of next? Let me know in the comments!

Thanks for your interest!

Kurt

Alternative (Glass Dryplate) Photography

Thanks to a really cool recent find at a local garage sale, I’m about to experience a new hobby. Alternative, or dryplate, photography.

I bought an old camera from the late 1800s. 1896 actually. I will post details about the camera soon. This camera does not take film. Film was invented in the late 1880s, but was not super popular yet. The simple Kodak Brownie box camera changed the game in 1900, though, and dryplate photography dwindled from there.

Dryplate photography basically means that the camera exposed light to a glass plate that had been previously treated with a light sensitive silver gelatin coating. Most dryplate cameras could only expose one photo before having to swap out the glass plate or flip the plate holder around for a second exposure.

I’m really lucky that the camera I bought came with one dryplate glass negative, shown above. I scanned it and this is the scanned negative image.

And here is what it looks like after inverting to normal colors and tweaking the histogram levels.

Pretty cool, huh?!?

Anyone out there in Internet-land have any idea who these five relaxing old-timey gentlemen are? Feel free to put your guesses in the comments!

Thanks,

Kurt

Kurt was in “F1: The Movie”

… for a split second. But it still counts! LOL!

I was a paid extra in the big new F1 film, Brad Pitt’s biggest film to date. I took time off my day job at NASA and I worked 3 full 12-hour-long days on the film.  I took part in filming during the Rolex24 race at the Daytona Speedway on January 25th, 27th, and 28th of 2024. I played the part of a racetrack photographer or journalist and I was placed into several scenes. Only one shot of me made it into the film though. And I can only be seen for a split second in the final cut.

I show up in the first 3 minutes of the movie when Brad Pitt is awoken in his van and then he walks from his van to the racetrack. This walking scene is at 6 minutes 27 seconds in the following “Making of F1 The Movie” featurette:

Brad is walking away from the camera and I am passing by and walking towards the camera. You can see me at the beginning of the walking scene with me passing by on Brad Pitt’s left side and exiting out of frame-left. It’s only a split second and it’s a very dark scene, so it’s not very easy to tell that it’s even me. Oh well.  I know it’s me and that’s what counts!

Here’s a screen grab from the featurette:

Here’s a photo from Day 1.  They gave us all these cool looking “Film Crew” passes.  Very nice.

The parking pass was also pretty cool.  I left it on my car for more than a full year!

The background extras all checked in and hung out in a big tent that was set up in the infield of the Daytona Speedway.  Remember that the Rolex24 event was taking place all around us and was being used as part of the backdrop of the film.  It was a little crazy.  About half of this tent was also used by the wardrobe department.

Once we were escorted to set, which was a bit of a walk from the extras/wardrobe tent, we hung out in a holding area till the set was ready for filming.  The holding area was victory lane.  There was no relief from the sun and it was quite hot in the holding area.  Lucky for me, my racetrack photographer wardrobe included a floppy hat and sunglasses:

The only scene I was put into on my first day of work was the garage scene where Javier/Ruben comes into the garage with the winners trophy and talks to Brad/Sonny.  I was in the crowd outside the garage and you cannot see me in the film because I ended up behind the wall separating two garages. Oh well.

Video Village was right there in the corner of our holding area, which was pretty cool to see.  Video Village is the dedicated area with video monitors where the director and other crew members watch live camera feeds and make decisions about the shot.  Actors sometimes come to Video Village after a scene is filmed to get a sneak peek at their performance.

The only scene I was put into on my second day of work was the Brad Pitt walking scene from his van to the race track.  It was filmed at around 10pm at night and it involved a lot of extras crossing in different directions and at different distances in order to show the activity during an active Rolex24 race.

I was lucky enough to have been placed near the beginning of the scene and I was directed to pass right by Brad towards the camera that was following him in the scene.  It was a fairly narrow walking path and I passed close enough to bump into him, although I was very careful to avoid that.

The scene started right here with Brad exiting his van:

I snuck a selfie with the van set at the end of the day as we were walking back to the extras tent.  We weren’t supposed to take photos, but I’m pretty sure that was to avoid spoilers on social media.  There’s nothing to spoil now that he movie is out, so I suspect these photos are okay to post now.

My third day of work was quite boring because I was not put into any scenes at all that day. I think many of the extras were in the same boat that day.  I guess the film crew had us come in just in case but then ended up not needing many of us after all.  Oh well.

The whole experience of being an extra in the film wasn’t easy. It was a lot of sitting around and waiting, but that’s pretty typical in the business.  There was also a lot of time spent waiting in the sun with very little shade/water/snacks.  That part wasn’t very fun.  But we got through it.

As a highly technical person, I really enjoy watching the crew set up and work.  I also made a great new friend, Jerry, during my time there.  And I ended up making it into that walking scene at he beginning of the film. And in case you were wondering, this is not a volunteer thing … they paid us real money for the gig.

So overall it was a good experience for me  I will keep my eyes out for another opportunity to take part in another cool TV or film project near me.  It can be a fun diversion from the daily NASA Engineer grind.  LOL

Kurt

Kurt’s First NASA Internship Term Report: Spring 1991

Today, January 7th 2024, marks exactly 33 years of my working for NASA. I recently found the below 2-page, single-spaced report that I wrote at the end of my first internship semester, Spring of 1991. Who remembers dot matrix printers?!?

My first internship term was a pretty good start to my NASA career I think. It’s been a crazy 33 year ride so far with no end in sight just yet. I’ve still got a few more years in me, I think!

Thanks for your interest!

Kurt

Search Engine Section

Feel free to ignore the below section. I’m just repeating the report below in plain text for the benefit of search engines.

Kurt W. Leucht
Electrical Engineering
University of Missouri-Rolla
Failure Analysis & Materials Evaluation (FAME) Branch of the Materials Science Laboratories (MSL)
Branch Chief: Irby Moore
Electronics/Metrology Section 
Section Chief: Gary Bassett
starting wages: $6.98/hr.	ending wages: $7.28/hr.
total earnings: $6650.00	approximate savings: $2500.00
duty hours: 7:00 to 3:30
forwarding address:


---------------------------------------
Irby Moore
 
     I was assigned to the Failure Analysis & Materials Evaluation (FAME) branch and worked primarily in the Electronics and Metrology Laboratory since my major is electrical engineering. My principal duties included working with the electrical engineers on failure investigations and managing the video area or Real-Time Documentation Laboratory, which is an integral part of the FAME branch. During my first term I became proficient in the area of television and video technology. The video area in the Electronics and Metrology laboratory is basically a small television studio where it's possible to produce and edit presentations about critical failure investigations. The requester of the investigation can then take this presentation to his/her upper-level management to show them the status of the investigation. It also gives them something to work with while they're waiting for the report from the lab to be published. It's known that a picture is worth a thousand words. In our case, a video is worth a thousand pictures. There are many cases where a stack of pictures can't tell the same story as a short video presentation, so video has become an important part of our failure investigations.
     The video area is also used to generate instant high-resolution photographs from a live camera, a video tape, or our computer generated video. Since these photos can be placed directly into our reports, this capability is used extensively in the laboratory. In my first few months here, I became an expert on photo-documentation from video. I learned about photography and good lighting techniques. I mastered the professional-quality digital camera and the lenses and accessories that go with it. I also became skillful in the use of the computer system that manipulates video images.
     Among my secondary duties was the calibration and maintenance of the video area and all of it's equipment. I've become well-practiced in the area of state-of-the-art digital oscilloscopes and television waveform analyzers/vectorscopes. I did some research into the theory of operation and the testing and calibration of the video equipment before I could understand enough to try troubleshooting problems. I wrote a procedure for the general calibration of the video area so that anyone not completely familiar with every piece of equipment could follow specific instructions and get everything working properly. The procedure was written in a way that was meant to help the person understand how the video system works. I've also been working on a manual to show someone who knows absolutely nothing about the video area how to use the basic functions of most of the equipment in the lab. This will give everyone in the branch the ability to use the video lab.
     By working in other sections of the branch, I've had many chances to work with engineers and technicians from other fields. On several occasions I've gone to the launch pads or to the Orbiter Processing Facilities with the engineers from the Metallurgy Section and helped them take hardness readings on different metal surfaces as part of a failure investigation. In the Mechanical Section I've helped the engineers set up x-ray experiments and film them for future use. In the Physical Testing Section, I've learned how to use the tensile/compression machines and the vacuum chamber. For KSC's Open House, I produced a professional-quality video presentation about the Physical Testing Section's vibration laboratory. Also for Open House, I performed a demonstration on cryogenics and superconductivity throughout the day. In the Electronics and Metrology Section I've done a lot more than just taken pictures. During failure investigations I made electrical test setups from schematics, ran the tests, and helped analyze the data. I've made numerous video presentations for the engineers and requesters of the investigations. I also initiated a system between the lab and the Press Site for obtaining multiple copies of videos for distribution and obtaining high quality scenes of KSC activities for insertion in our productions. I've sent video presentations that were made in the lab over satellites to other centers through the Video Teleconferencing System in the Headquarters Building. I've begun organizing the stock ordering system in the lab and have ordered supplies as needed. I also help write PR's [purchase requests] and SR's [support requests] and have even 'walked through' important PR's
     I have always been interested in space exploration and I've always wanted to work for NASA so that I could be a part of that exploration. In high school, I painted a mural of the space shuttle on the wall of the library. Now that I'm officially a civil servant, although the pay isn't spectacular, it's great to be able to feel like I'm a part of the space program and that I can truly make a difference. While I was here I witnessed two launches from the Vehicle Assembly Building area. I was able to go to the launch pad one morning to watch Discovery being rolled up the ramp to the pad and I even got my picture taken in front of it. I was fortunate enough to get out to the Shuttle Landing Facility and see Discovery land here and I also saw Endeavor fly in atop the new 747 shuttle-craft.
     My experiences here at KSC have helped me gain more understanding of my major field of study. Since most students choose their major during their freshman year, it's often hard for them to understand what's ahead of them. But since I've experienced first-hand what's in my future, I have a choice that most students don't have the chance to make. I have the option to change my major if the work here isn't what I thought it might be. And if I were to choose not to work for NASA, I could take my experience to another employer after I graduate and be a step above the other graduates. If I were to graduate today though, I'd take a job right here in the FAME branch. Being an engineer here in the labs is unique in the fact that it's completely a hands-on experience, not a desk job or a job of looking over a technician's shoulder while they do all the work. That's probably what I like most about the FAME labs. I'm a little excited to get back to school, but I can't wait to come back to KSC and get back to work!

The Case Of The Magically Appearing Fish Scale

Yesterday afternoon I was driving along a rural Florida highway just minding my own business when a single solitary fish scale appeared on my windshield.

I’m no detective, but curiosity got the better of me. Where did this fish scale come from? And how did it get on my windshield?

So I quickly I pulled over to investigate. I walked along the highway looking for clues.

All I found was a small mess of unidentifiable carcass lying on the road. It was fairly mangled, but I could clearly make out a few fish parts. Like fins. And tail. And meat.

So I quickly deduced that the fish scale which had suddenly appeared on my windshield had somehow come from this mangled mess of fish carcass.

But how?

And why?

I was at a complete loss.

Maybe you can help me solve this strange and complex mystery.

Below are some photos of the fish scale as it appeared on my windshield.

Now that I think about it, I did notice a big bald eagle launch out of a tall tree and fly overhead while I was walking back to my car after finding that mangled fish carcass.

Again, I’m no detective. But all clues seem to point to the following:

One, that this big bald eagle hates me.

And two, that he’s a really good shot!

Thanks for your interest!

Follow me for even more crack investigative work!

Kurt


Thanks for visiting,
Kurt & Sam Leucht
Titusville, FL
http://www.leucht.com/
Email Us or Give Feedback!
(Report a Problem, Request a Feature)